How to Create Snow in Photoshop

How to Create Snow in Photoshop

Do you want to create stunning snow scenes in your digital art? If so, you’re going to love this tutorial. I’ve created a brush set for snow in photoshop that you can use to add realistic snow Patch, Falling Snow, icicle, Fog, and snow-covered objects to your paintings. In this post, I’ll show you how to use these brushes to make a beautiful winter landscape in Photoshop. By the end of this tutorial, you’ll be able to create your own snow scenes with ease and confidence. Ready to get started? Let’s go!

Tutorial Resources

Snow Brushes

Step 1: Open your image in Photoshop.

Step 2: Paint the snow on the ground.

Now that you have your image open, you can start painting the snow on the ground. To do this, you need to select the patch snow brush from my snow brush set. This brush will create a realistic snow texture that covers the original surface. To select the patch snow brush,
go to the Brush Tool (B) and click on the Brush Preset Picker in the Options Bar. Then scroll down until you find the brush and click on it.

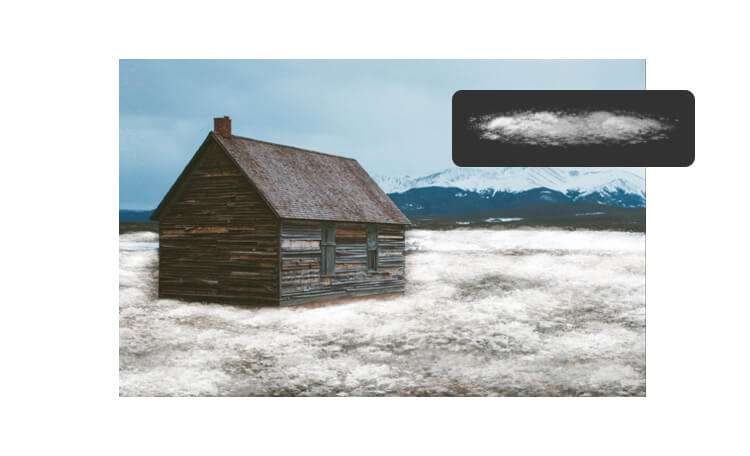
snow in photoshop

Step 3: Paint the snow on other objects.

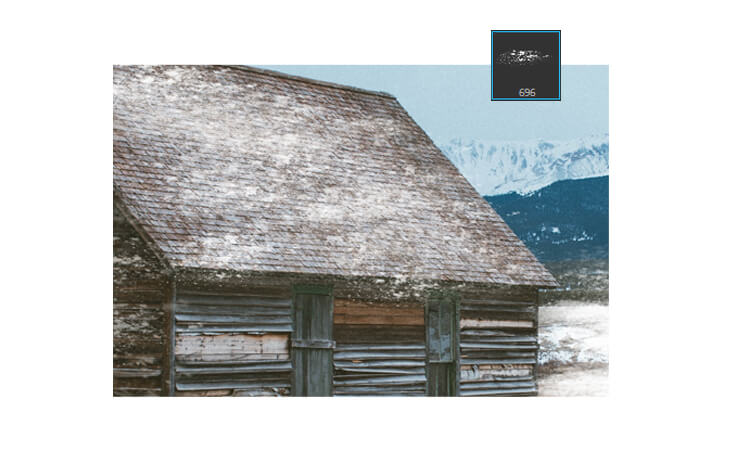
After you have painted the snow on the ground, you can use other patch brushes to cover other objects in your image, such as a car or a mountain. This patch brush is lighter and more transparent, so they will create a subtle snow effect that blends with the original color,
select this Patch snow Brush to paint over the areas you want to cover.
Be careful not to overdo it, as too much snow can make your image look unrealistic.
Snow in photoshop

Step 4: Paint the icicles.

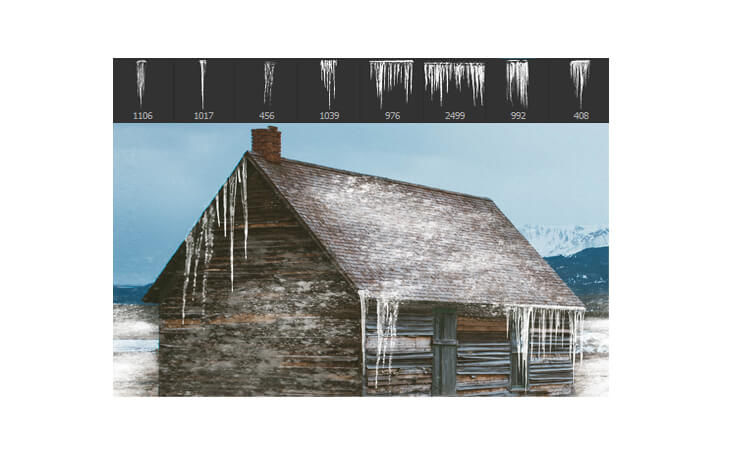
The next thing you can do is to paint some icicles on your image. Icicles are frozen water droplets that hang from the edges of roofs, windows, or other objects. They can add some interest and realism to your snow scene. To paint icicles, you need to use the icicle brush from my snow brush set. These brushes will help you to create different shapes and lengths of icicles.
Snow in photoshop

Step 5: Paint the fog.

Another way to enhance your snow scene is to paint some fog in the background. Fog is a thin layer of mist that reduces the visibility and creates a soft and mysterious atmosphere. To paint fog, you need to use the fog brush from my snow brush set. This brush will create a smooth and cloudy effect that fades the colors and details of the background. You can also adjust the brush size and opacity depending on how much fog you want to create.
Be careful not to cover the foreground or the main focus of your image, as this can make your image look too blurry.
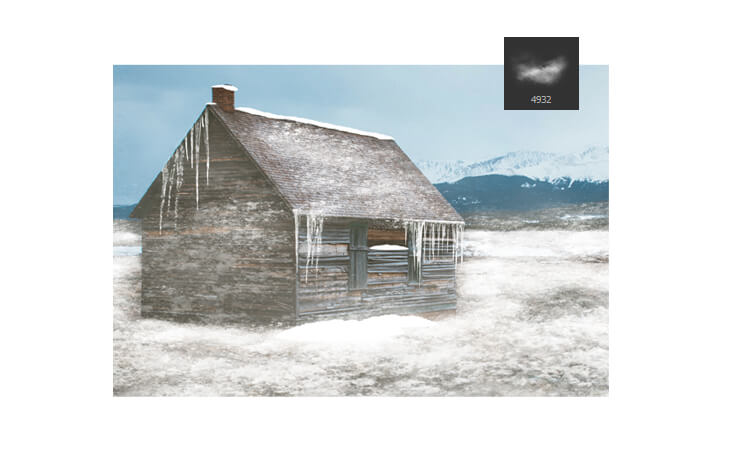

Step 6: Paint the falling snow.

The final touch you can add to your snow scene is to paint some falling snow in photoshop. Falling snow is a collection of snowflakes that drift down from the sky and create a sense of movement and depth. Select falling snow brush from my snow brush set. This brush will create a random pattern of small dots that resemble snowflakes.

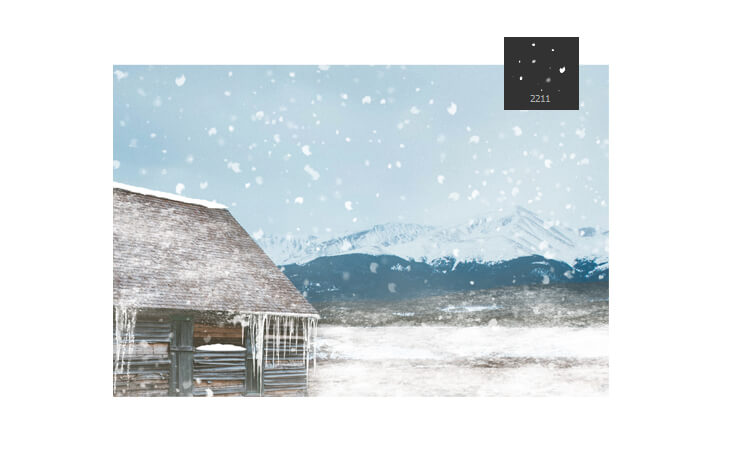
Finished!
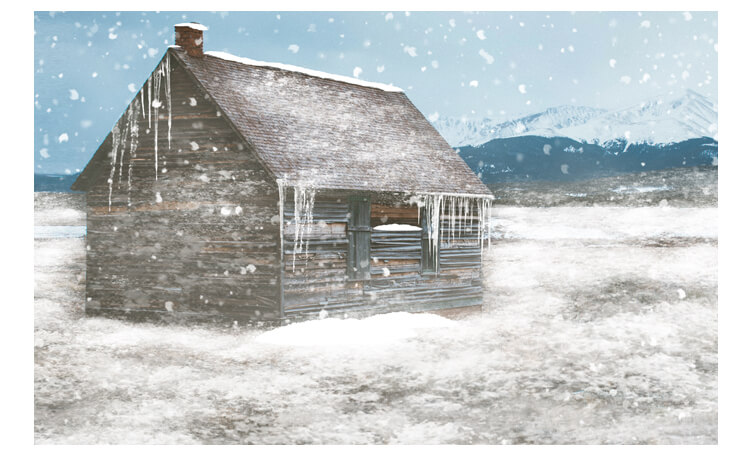
Congratulations!

You have successfully created a snow scene in Photoshop.
I hope you enjoyed this tutorial and learned some useful tips and tricks.

see other tips &Tricks

How to make Realistic bubbles in Photoshop

Do you want to learn how to create realistic bubbles in Photoshop? Bubbles can add a fun and magical touch to any photo, but they can be tricky to make look natural and convincing. In this tutorial, I will show you how to use my brushes and techniques to create amazing bubble effects in Photoshop. You will also learn how to customize the colors, shapes, and sizes of the bubbles to fit your style. By the end of this tutorial, you will be able to transform any photo into a bubbly masterpiece. Let’s dive in!

Tutorial Resources
Bubbles Brushes
12 high quality Dynamic water Bubbles brushes + 6 Pattern, you can Paint with Bubbles and change your Bubbles colors to get a colorful pack right away!


Before we start, you need to import a pattern that we will use for the bubbles.

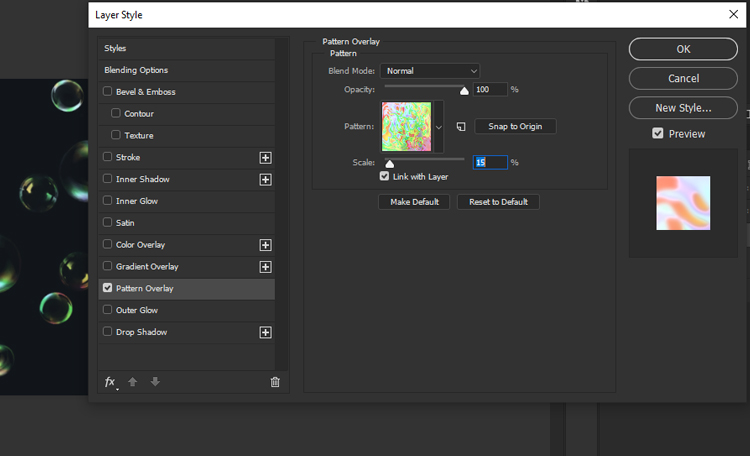
Now we will apply the pattern effect to the bubbles. To do that, you need to select the layer to right-click on the layer with the bubbles and select Blending Options. Then, choose Pattern from the list of blend modes and click OK.


How to Import Patterns in Photoshop

How to import Photoshop Pattern
Do you want to add some flair and texture to your designs in Photoshop? If so, you might want to use patterns. Patterns are repeating images that can fill any shape or area with a seamless effect. You can use patterns to create backgrounds, Brushes, Designs, Logos, and more.

But how do you import photoshop pattern? Maybe you have downloaded some patterns from the internet and want to use them in your projects. Or maybe you have created your own patterns and want to save them for later use.

In this blog post, I will show you how to import patterns in Photoshop in a few simple steps, and how to use them in your designs.


Step 1

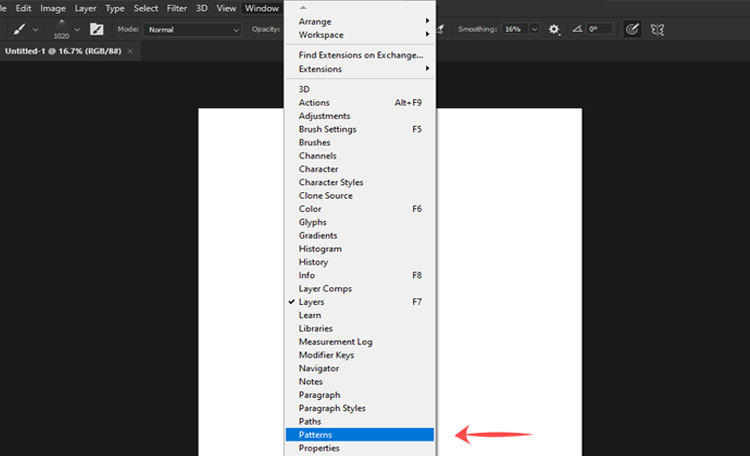
In Photoshop open the Patterns Panel (Window > Patterns)

photoshop pattern

Step 2

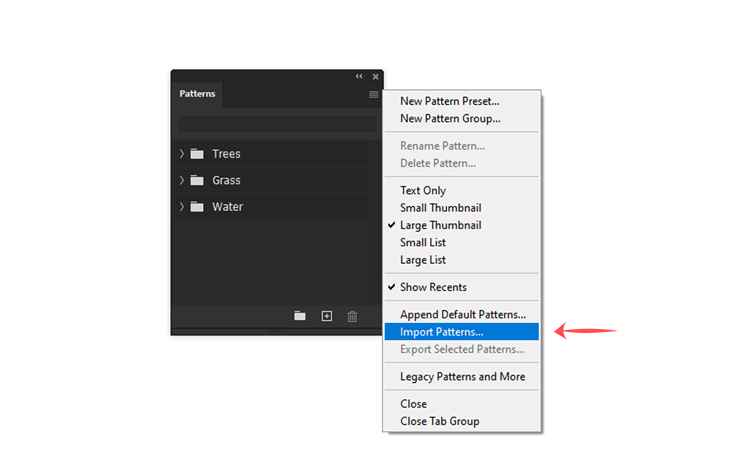
Open the menu and choose Import Patterns

photoshop pattern

Locate your (.pat file) on your hard drive, Click Open to install.

That’s it! You have successfully imported the patterns into Photoshop. You can now see them in the Patterns Panel and use them in your projects.

Photoshop CS6 Instructions.

Step 1

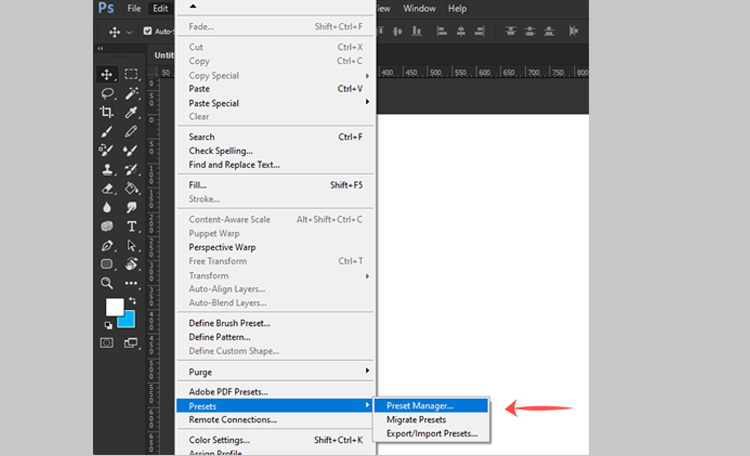
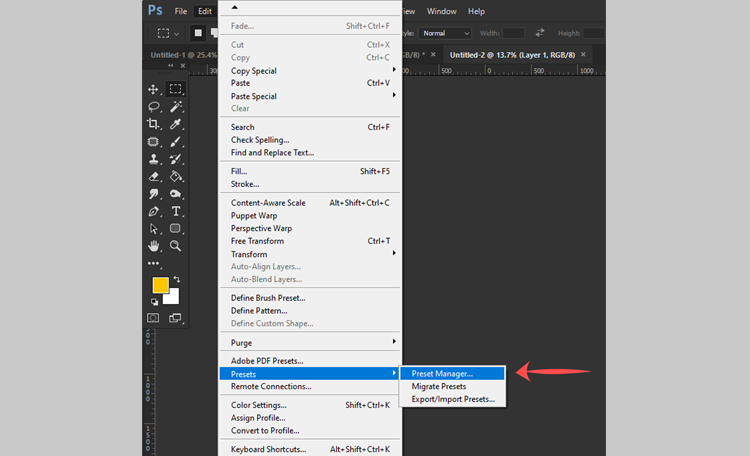
In Photoshop open the Preset Manager (Edit > Presets > Preset Manager)

Step 2

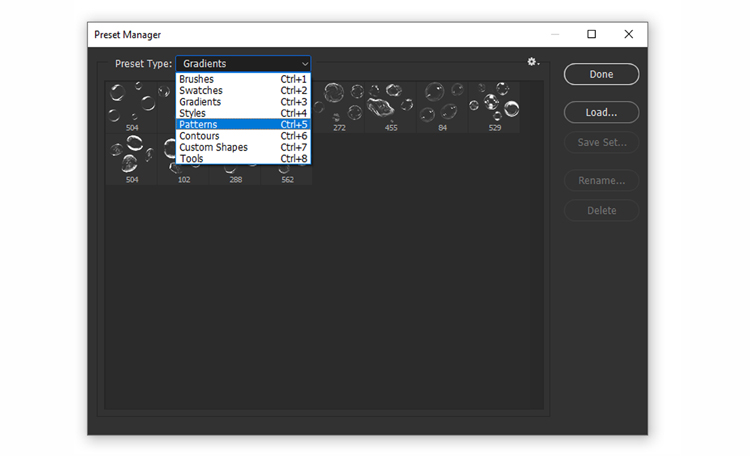
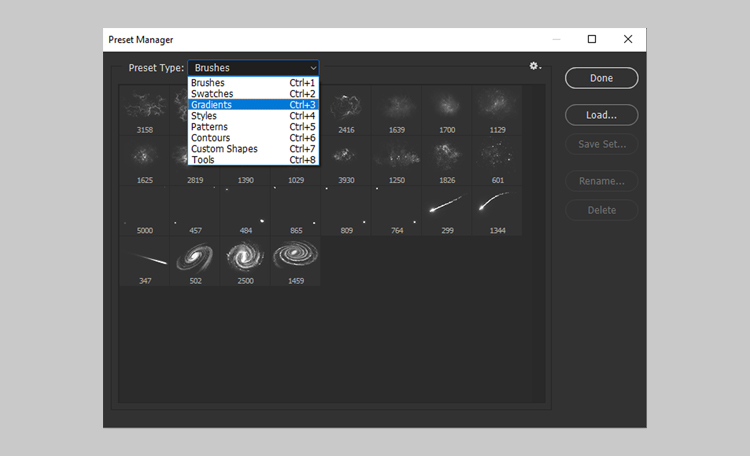
Select “Patterns” from the drop-down menu at the top of the Preset Manager.

photoshop pattern

Step 3

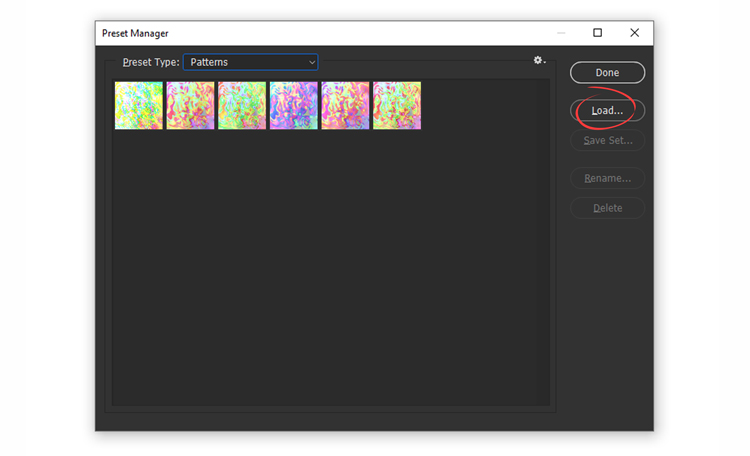
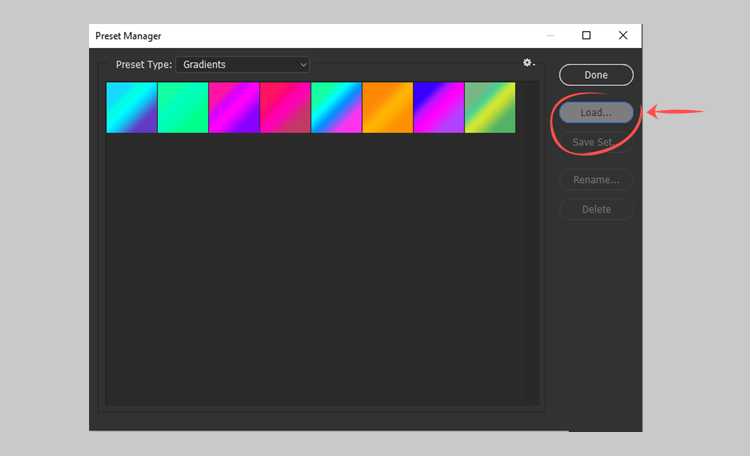
Click the load button then locate your .pat file on your hard drive.

photoshop pattern

I hope you enjoyed this tutorial and found it helpful.


How to Import Gradients into Photoshop

Gradients are a powerful tool in Photoshop that can help you create stunning effects on your images. But did you know that you can also import gradients from other sources and use them in your projects? In this tutorial, I will show you how to install gradients in Photoshop and how to use them to enhance your photos. You will learn how to access the Gradients panel, how to import gradients from a GRD file, and how to apply them as gradient layers or fill colors. Whether you are a beginner or an expert, you will find this tutorial useful and fun. Let’s get started!

Step 1

Go up to the Edit > Preset Manager

Step 2

From the Preset type drop down, select Gradients.

Step 3

Click on Load and select the gradient file (GRD FILES) Click on open, your new gradients will be added.

create an underwater scene in Photoshop

How to Make Realistic underwater in Photoshop

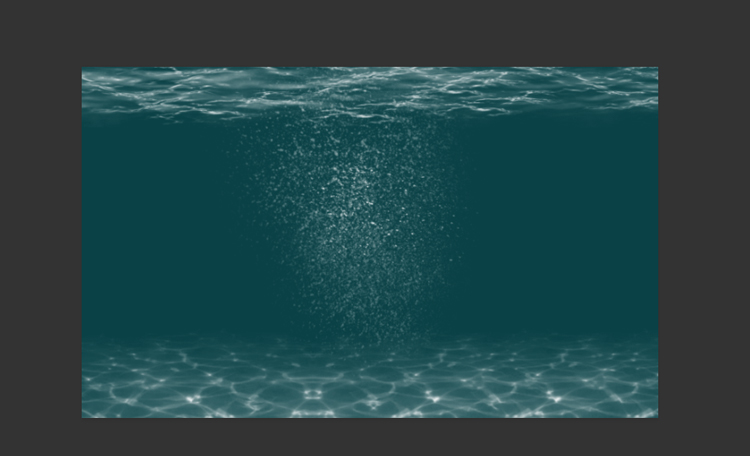
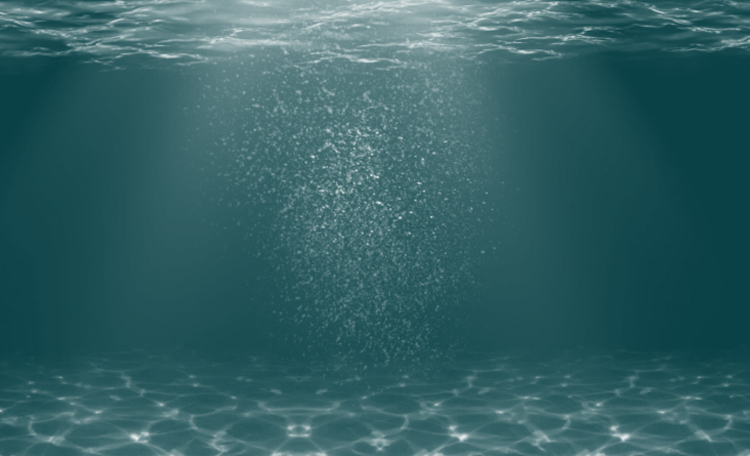
Create an Underwater Scene in Photoshop in this tutorial, you will learn how to create an underwater effect using Photoshop and my custom brushes. You will discover how to make realistic water effects, such as bubbles, reflections, and splashes. You will also learn how to add depth and atmosphere to your paintings by using color and lighting techniques. By the end of this tutorial, you will be able to create stunning underwater artworks with Photoshop and my brushes. You can apply this effect to any text or image you want to give it an amazing look. Let’s begin!

Tutorial Resources

Step 1

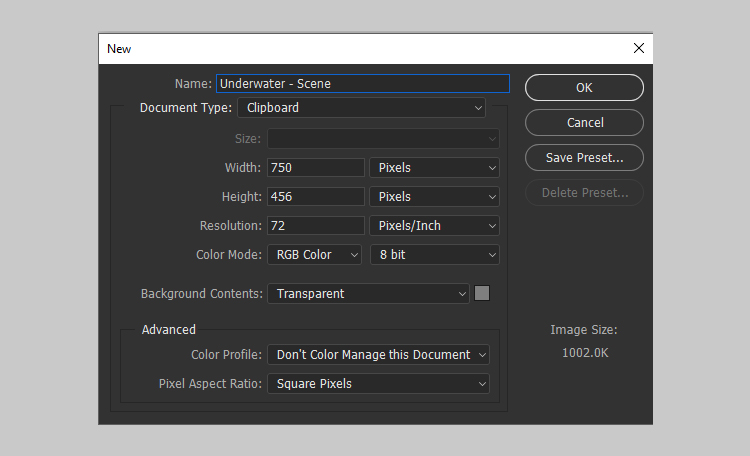
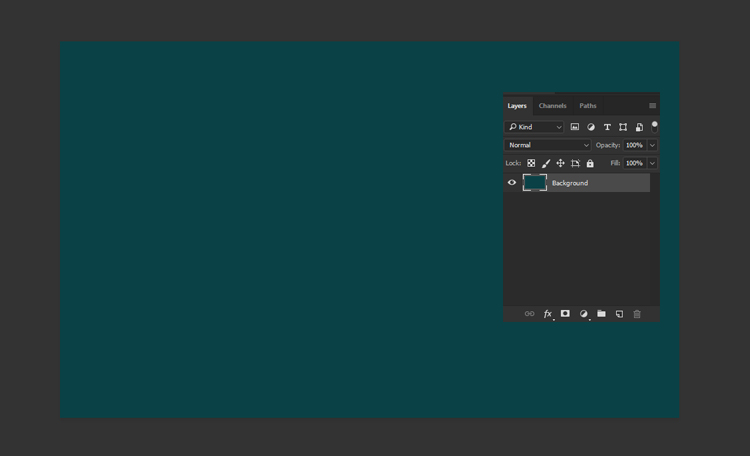
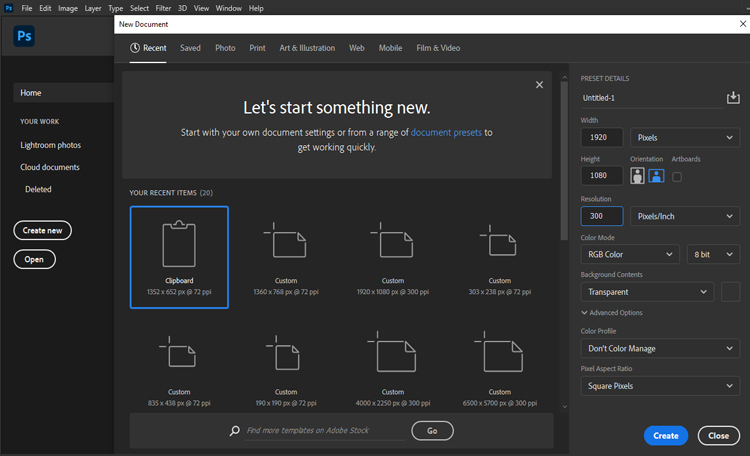
Create a new document in Photoshop with any size and orientation. You can use the same techniques for any canvas size.

For this example, I will use a 750 x 456 PX document with the settings below:

Step 2

Create a new layer for the background and fill it with a green color #0a4146 using the Paint Bucket Tool (G). This will be the base color of the water.

Step 3

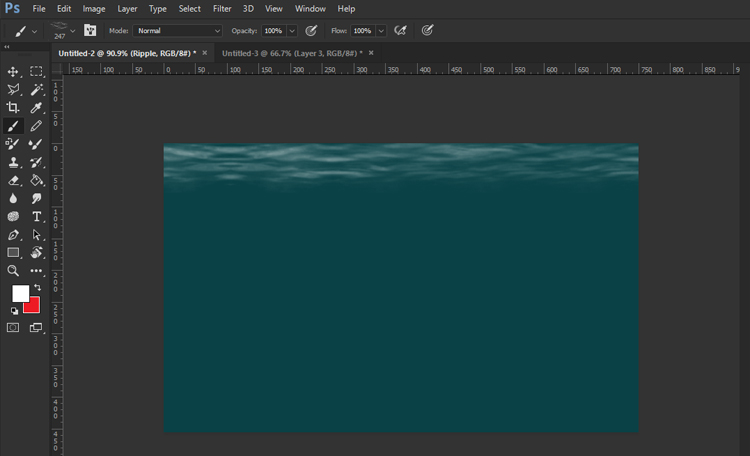
Next, you will create the top of the water using this Ocean Brush (you can find this brush and others in the underwater brushes pack). Create a new layer and name it Ripple. Paint the top of the water with a white color #ffffff using the Ocean Brush. Follow the direction of the waves as you paint.

Step 4

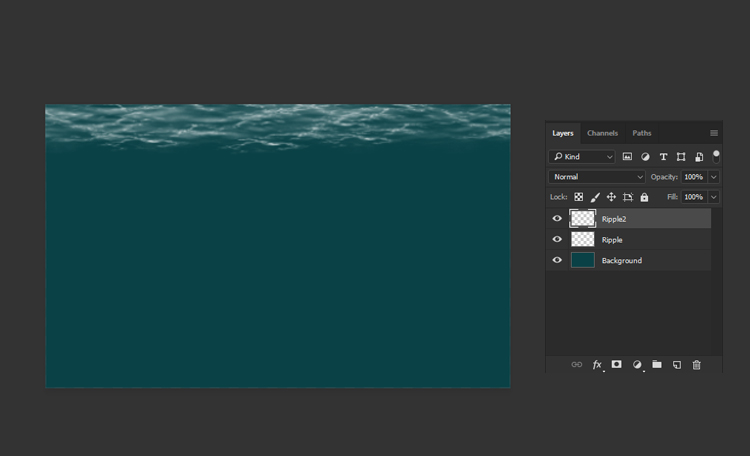
Create another layer and name it Ripple2. Place it above all the other layers. Use this brush to add some ripples to the water surface with a white color #ffffff. This will create a glowing effect for more realism.

Step 5

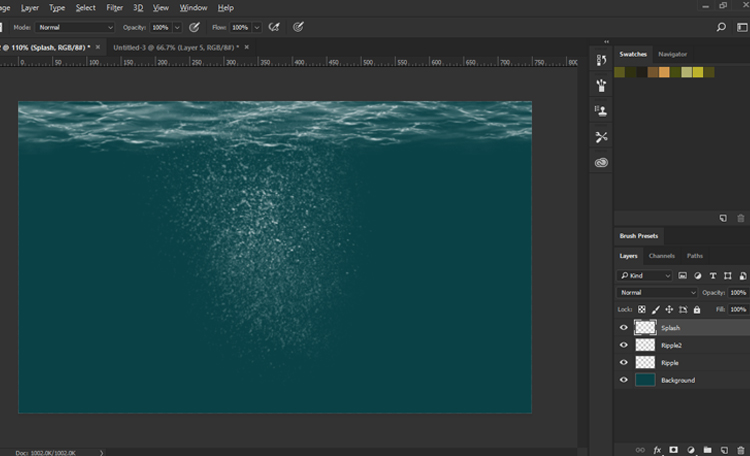
Now, you will create some splash water effects in Photoshop. Create a new layer and name it Splash. Use this Splash Brush to paint some falling water splashes with a white color #ffffff. You can vary the size and opacity of the brush to create different effects.

Step 6

Next, you will create the bottom of the water surface using this brush. Create a new layer and paint it with a white color #ffffff

This will create some highlights and reflections on the water.

Step 7

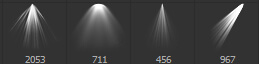
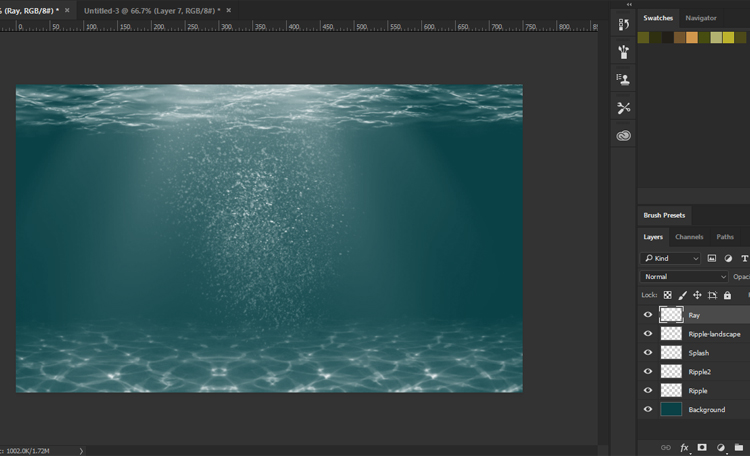
Finally, you will add some light rays to the underwater scene using this Light Brush. You will get 5 different brushes in the pack. You can use any of them. Create a new layer and paint some light rays with a white color #ffffff. You can adjust the size, opacity, and angle of the brush to create different effects.

Congratulations, You’re Done!

I hope you’ve enjoyed this tutorial and learned some new techniques. Enjoy!

How to install Photoshop Brushes

Installing Photoshop Brushes For (Photoshop CC 2020 and newer)

in This blog I will show you how to install Photoshop brushes.

This information applies to Adobe Photoshop CC 2019 through Photoshop 2022.
To get started, you’ll need to first download brushes for Photoshop, find your brush in our store

, and download our Photoshop brushes or brush pack you’ve chosen.
Launch Photoshop and create a new file or open an existing one!


how to install photoshop brushes


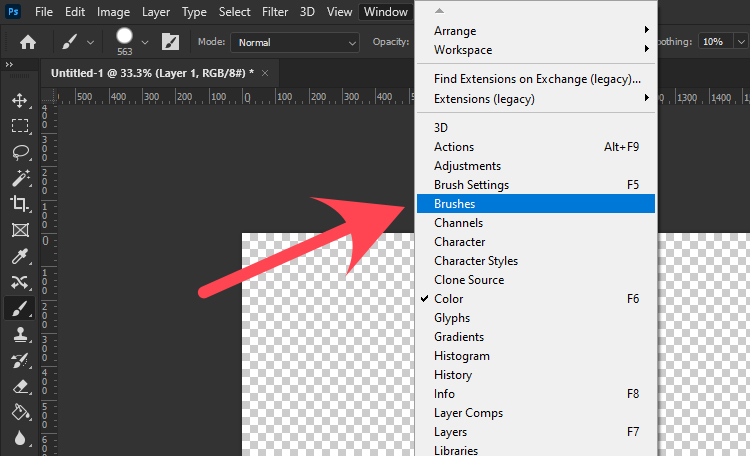
1. Open the Brushes panel, by going to Window > Brushes.


how to install photoshop brushes


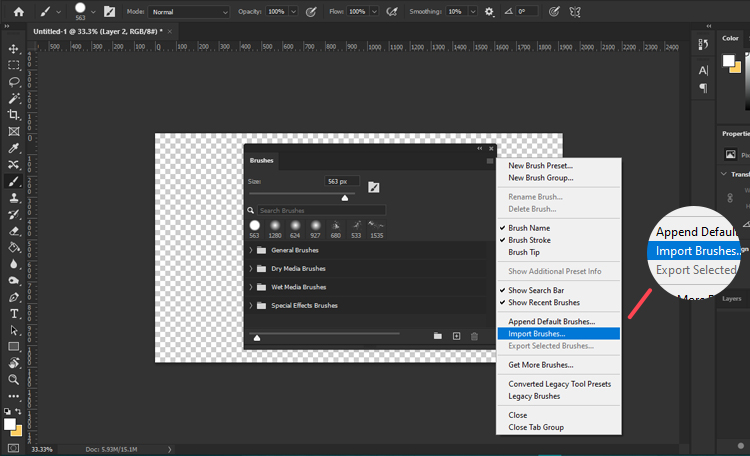
2. click the hamburger menu on the top right corner then click Import Brushes.


how to install photoshop brushes


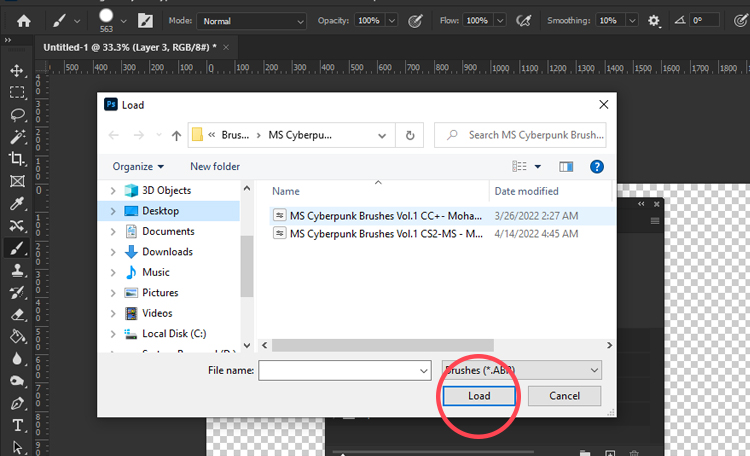
3. Locate your brush pack to select the ABR file of the brush pack.

4. then select “Load” button to insert them into Photoshop.


how to install photoshop brushes


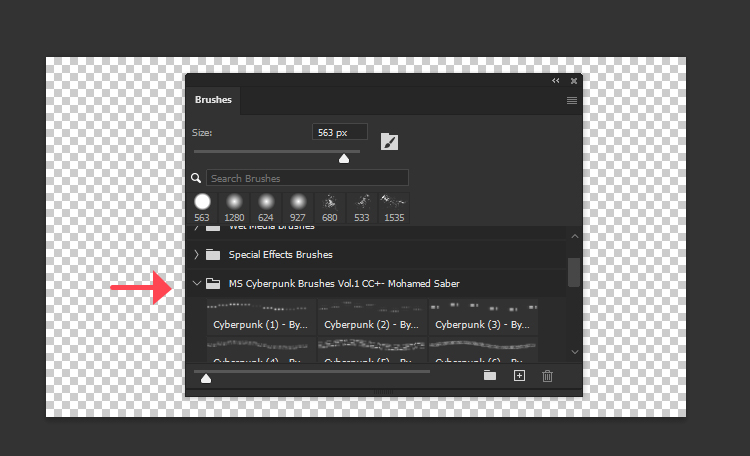
5.The new brush (or brush pack) displays in the Brushes window.

how to install photoshop brushes

How to install Photoshop Brushes in Older Photoshop Versions (CC 2019 and Older)

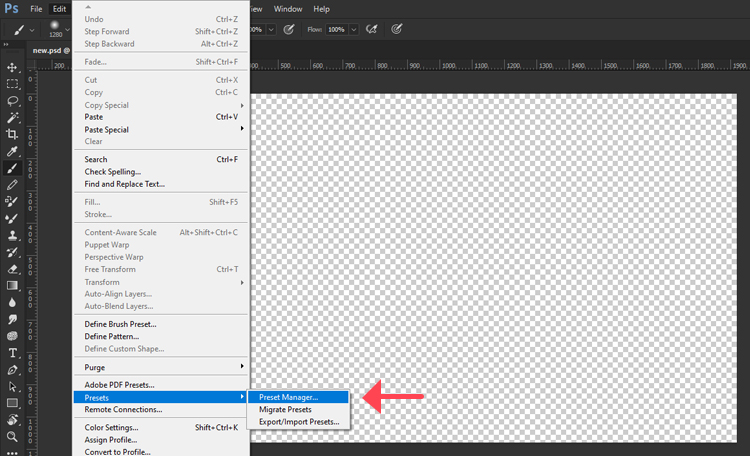
1. going to Edit > Presets > Preset Manager.

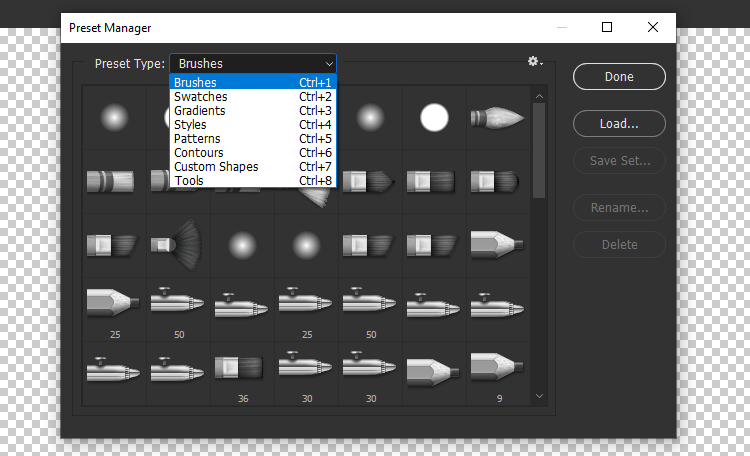
2.select from Preset Type menu “Brushes” or Ctrl+1(in keyboard).

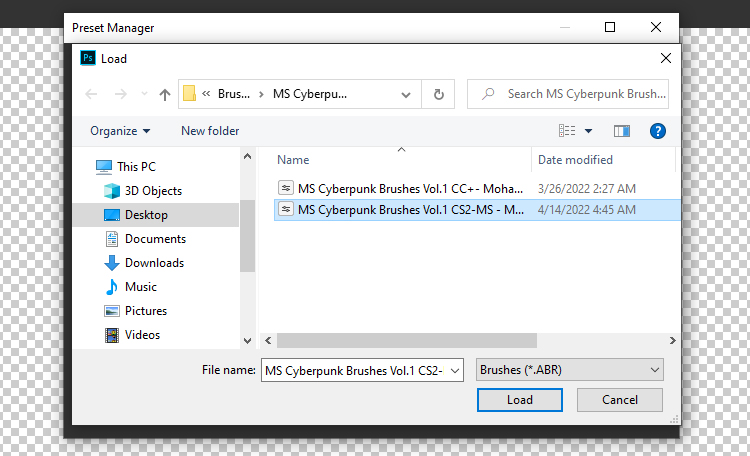
3.then select “Load” button to insert your brushes.

4.Locate your ABR file then Double Click ABR File

Enjoy!
read our blogs