
Tag: digital art

The Promise

“Two figures stand upon touching hands of stone—an eternal gesture of trust and unity, holding each other against the vastness of the world.”
Lost in space

“A lone traveler stands before endless blue depths—an otherworldly cavern glowing with mystery, where silence becomes both guide and companion.”
Freedom

From an open cage, radiant birds rise into the night—childhood longing turned into light, showing that creativity needs freedom to shine.
Enterprise

Under the brilliance of a full moon, the journey unfolds. The glowing light becomes both guide and companion, illuminating paths of courage and wonder.
How to Paint Stunning Ocean Waves in Photoshop

How to Paint Stunning Ocean Waves in Photoshop
Ever wondered how to capture the mesmerizing movement of ocean waves in your digital art? Painting realistic ocean waves can seem daunting, but with the right tools and guidance, anyone can master this art form. In this comprehensive guide, we’ll walk you through the entire process of painting ocean waves in Photoshop, from setting up your workspace to adding those final, intricate details that make your waves come alive. We’ll be using our custom brush sets designed specifically for painting ocean waves, ensuring that even beginners can achieve professional-quality results. You’ll learn how to create the gentle ebb and flow of a calm sea as well as the dramatic crashes of stormy waves. By the end of this guide, you’ll have the skills and confidence to bring the beauty of the ocean to your digital canvas. Ready to dive in? Let’s get started with the essentials and discover the joy of painting ocean waves in Photoshop from scratch!
Tutorial Assets
Before you start painting, you’ll need to import your custom ABR brushes into Photoshop.
Step 1: Draw a Quick Sketch of the Wave
Before diving into the detailed painting process, it’s crucial to have a clear vision of the wave you want to create.
A quick sketch serves as a foundation, helping you to map out the overall shape and movement of the wave.
Here’s how you can get started: – This is an example of a quick wave sketch to get you started.
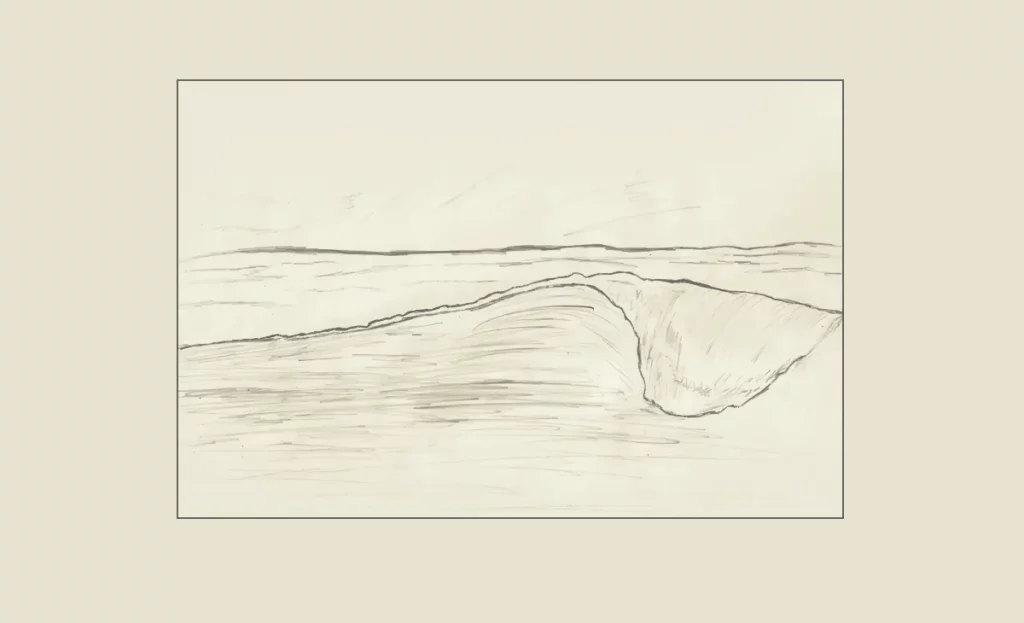
This initial sketch will serve as a road map for the rest of your painting process. Don’t worry about making it perfect; it’s just to give you an idea of the wave’s structure and flow.
Step 2: Select the Color of the Waves
Choosing the right color palette is essential for creating realistic and visually appealing ocean waves. For detailed guidance on how to select colors from images, be sure to read our article “How to Select a Color Palette from Images.”
For this tutorial, I’ll use these colors:
- Background:
#3189b9 - Peak:
#7fb9dd - Face Wave:
#7fb9dd - Splash / Foam:
#cae5f0 - Lighten
#5c9a9f - Bright Color:
#38a8bb - Ocean Base:
#053d62 - Ocean Highlight:
#20749c - Cloud:
#69add9
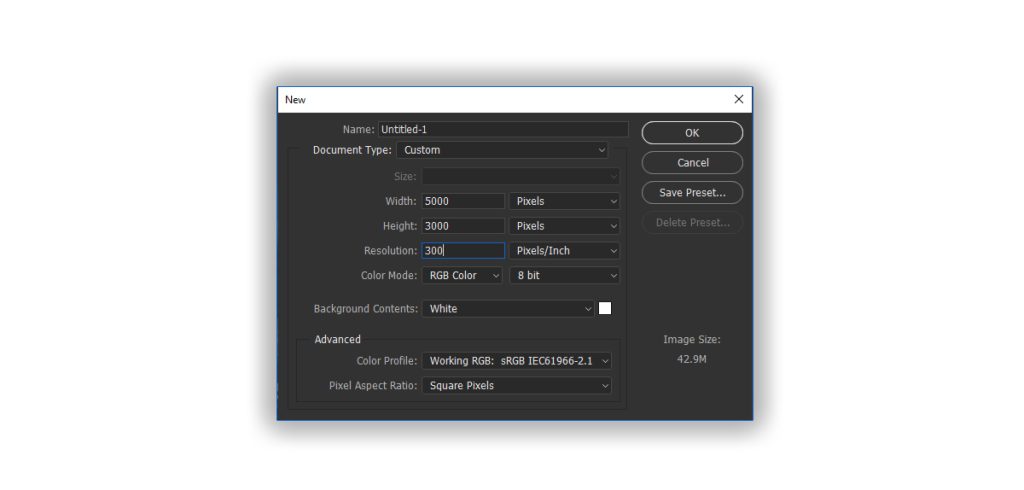
Next, let’s set up our new document:
- Open Photoshop: Launch Photoshop on your computer.
- Create a New Document: Go to
File > Newto open the New Document dialog box.
Open a New Document in Photoshop at 5000 x 3000 pixels and 300 dpi.
Step 3: Fill the Background
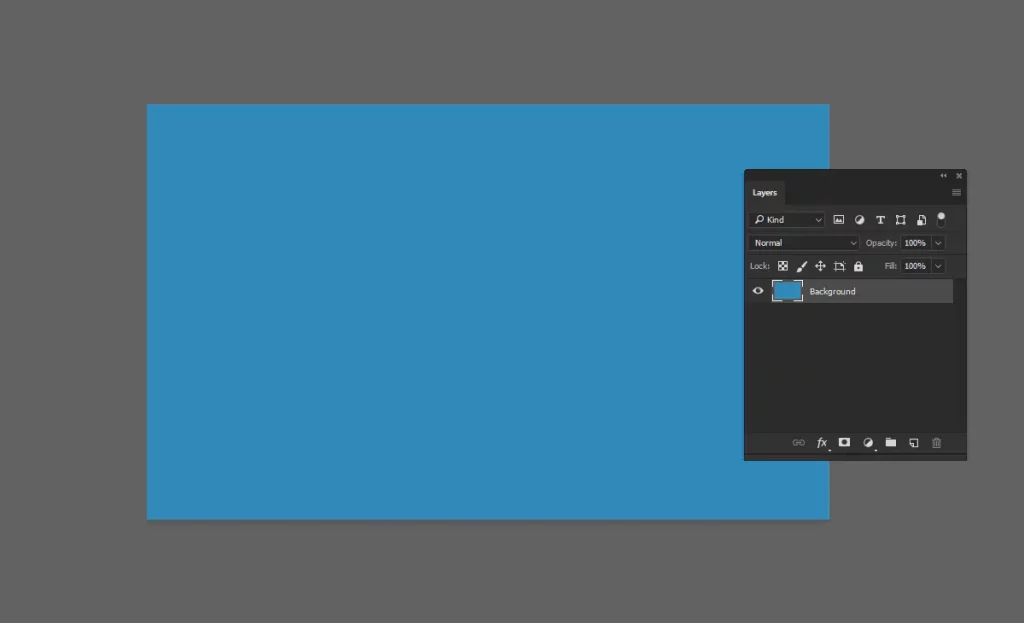
To create a visually appealing base for your ocean waves, let’s fill the background of our canvas with a suitable color.
- Select the Paint Bucket Tool: In the toolbar on the left, select the Paint Bucket Tool (G). If you can’t see it, right-click on the Gradient Tool to find it.
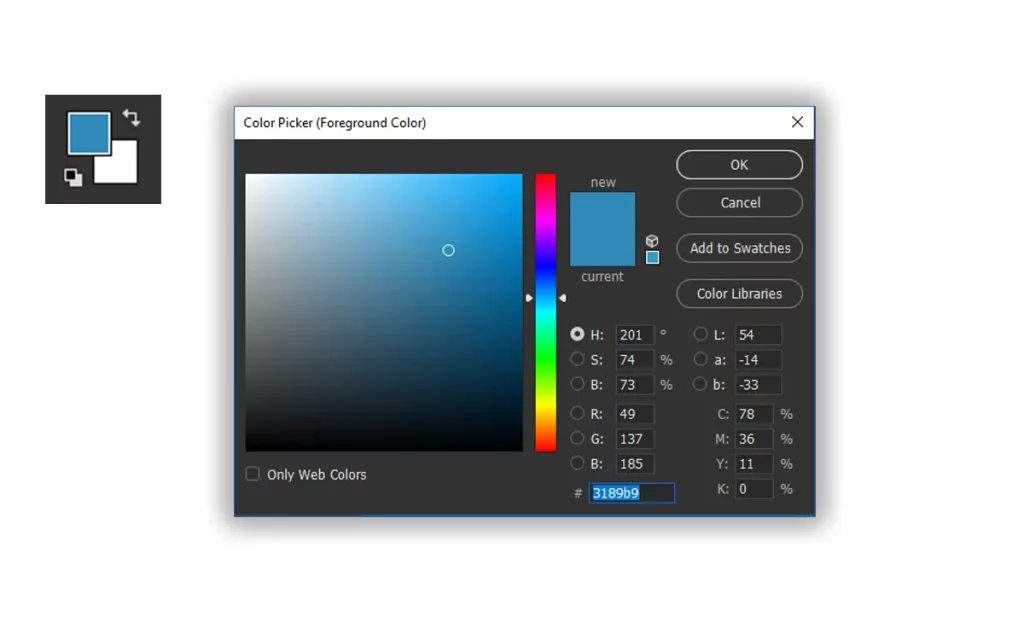
- Choose Your Background Color: Click on the Foreground color at the bottom of the toolbar to open the Color Picker. Enter the hex code
#3189b9.
- Fill the Background: Click anywhere on the blank canvas to fill it with the chosen color.
Step 4: Paint the Peak
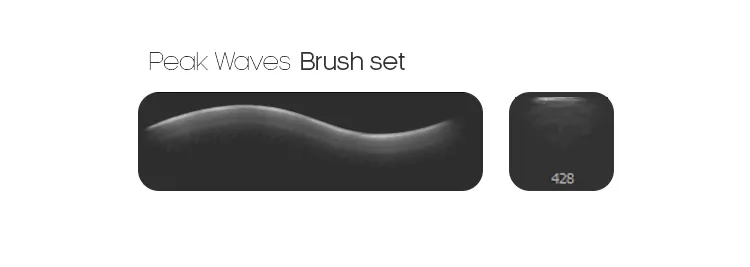
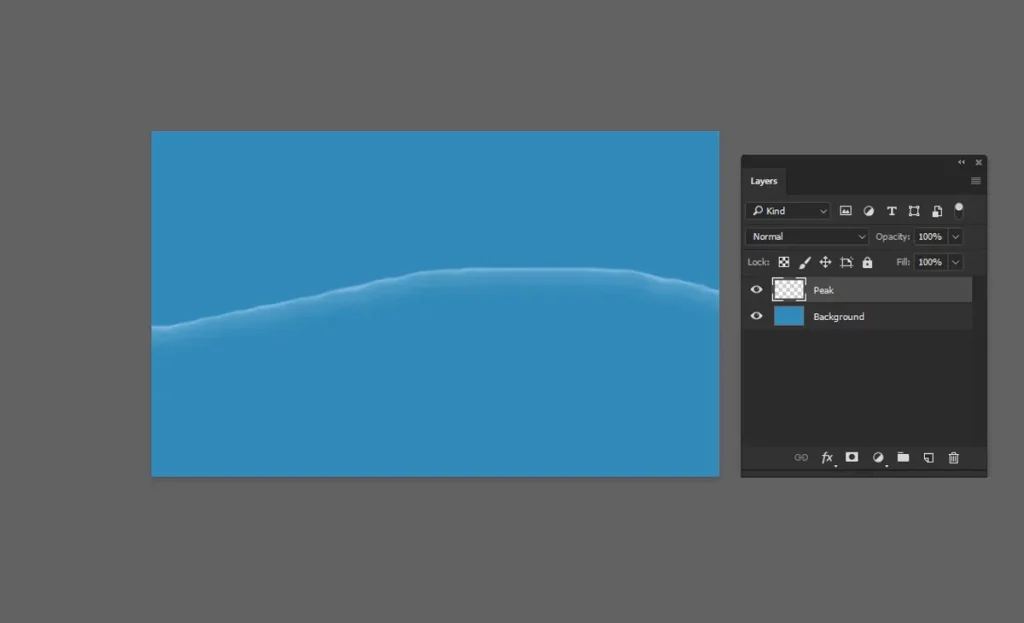
The peak is the topmost part of the wave, following the direction we sketched earlier. This is where the wave starts to crest, creating a beautiful highlight that gives the wave its dynamic appearance.
- Select the Peak Brush: From your custom brush pack, choose the brush designed specifically for painting the peak of the wave.
- Choose Your Peak Color: Set the Foreground color to
#7fb9dd. This color will help highlight the peak and add a sense of light and depth. - Paint the Peak: Using the selected brush, carefully paint along the top of your wave sketch. Follow the natural curve and direction of the wave. This will help emphasize the movement.
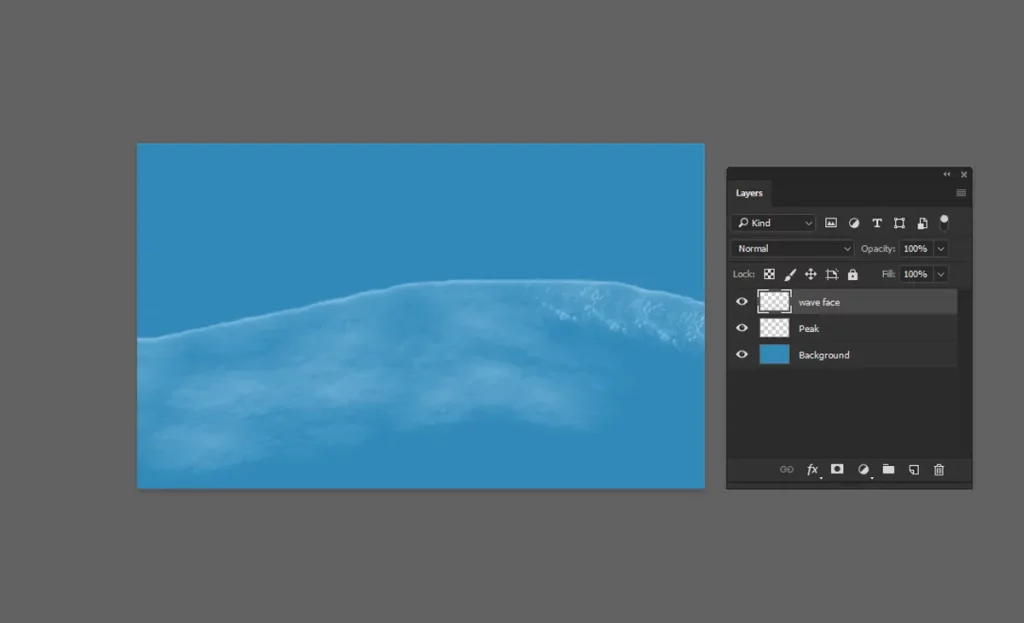
Step 5: Paint the Face of the Wave
Adding depth to your wave involves painting the face, which is the forward-facing part of the wave that catches light differently. Here’s how to do it:
- Create a New Layer: In the Layers panel, click the
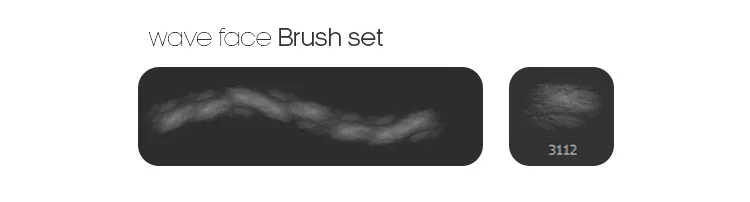
New Layericon to create a new layer above your background layer. This keeps your edits non-destructive and allows for easier adjustments later. - Select the Face Brush: From your custom brush pack, select the brush designed for painting the face of the wave. These brushes are tailored to create the smooth, flowing texture of the wave’s face.
- Set Your Color: Use the same color as the peak,
#7fb9dd, to maintain color harmony in your artwork. - Paint the Face of the Wave: Using the selected brush, paint the face of the wave, following the contours and direction of your initial sketch. Take your time to build up the color and texture, creating a sense of volume and movement.
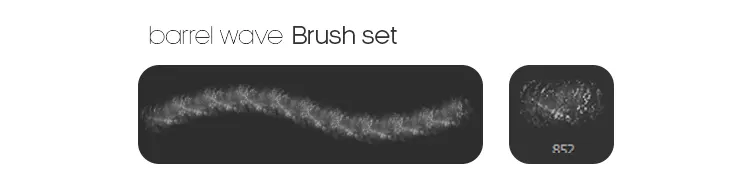
- Explore Different Brushes: Don’t forget to explore other face brushes in your pack to paint different types of waves. Each brush can offer a unique texture and style, enhancing the overall realism of your ocean scene.
Step 6: Paint the Splash
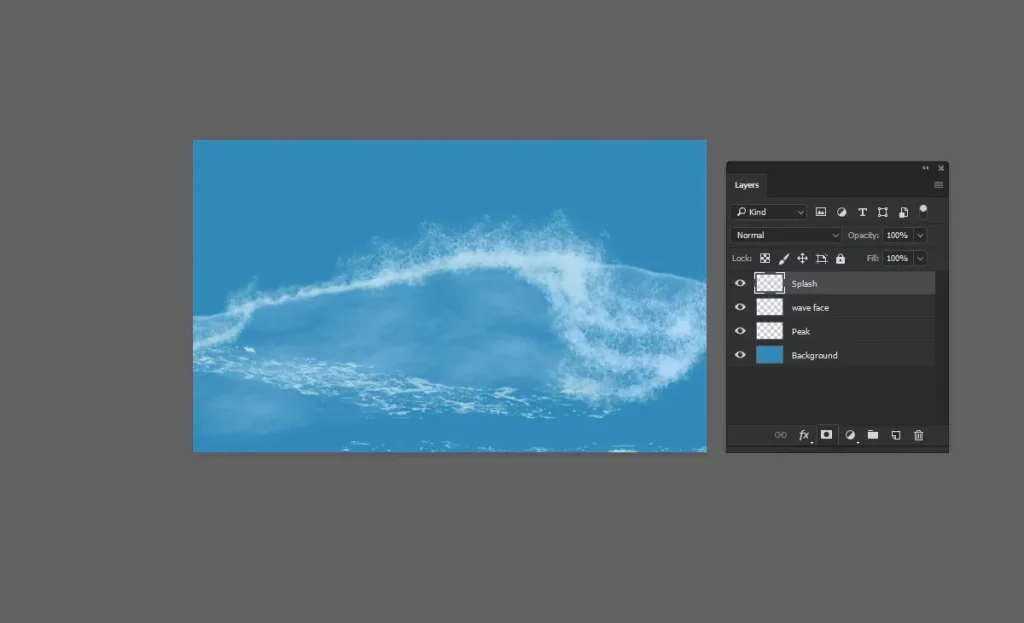
The splash of the wave is where the water breaks and sprays, creating a foamy, dynamic texture. Here’s how you can paint the splash:
- Create a New Layer: In the Layers panel, click the
New Layericon to create a new layer above your existing ones. This will keep your splash separate from the rest of your painting, making it easier to adjust. - Select the Splash Brush: From your custom brush pack, select the brush designed for painting the splash. This brush is versatile and can paint in any direction, allowing for dynamic and realistic wave splashes.

- Choose Your Splash Color: Set the Foreground color to
#cae5f0, which is perfect for highlighting the splash of the wave. - Paint the Splash: Using the selected brush, follow the direction of your initial sketch to paint the splash. Focus on the areas where the wave starts to break, adding details and texture to create the appearance of foam and movement. The brush should be able to follow the natural flow of the wave, enhancing the realistic look.
Step 7: Paint the Foam
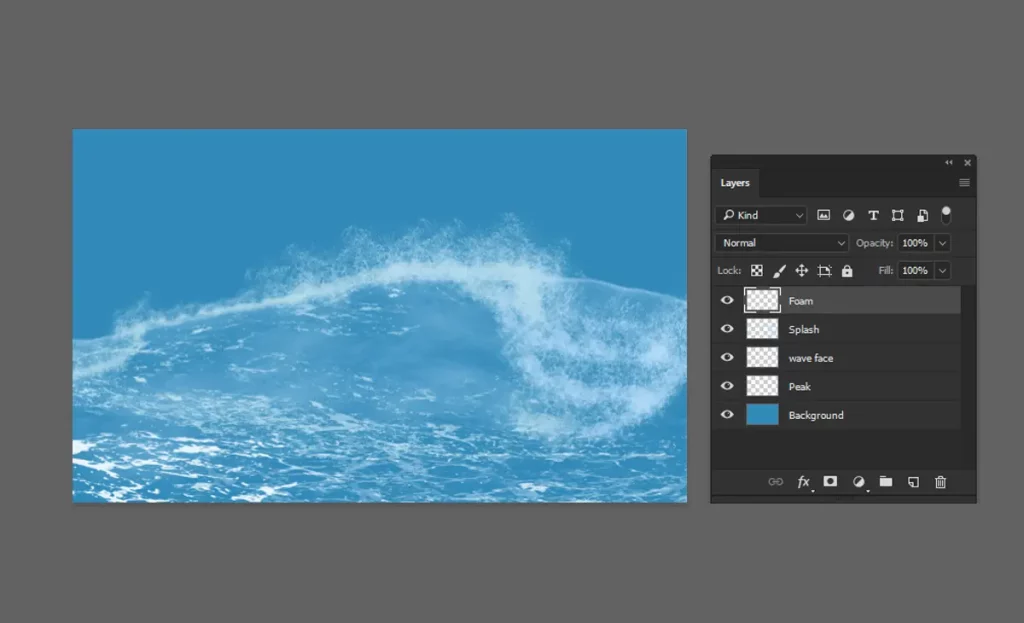
Adding foam to the wave will give it that extra touch of realism and movement. Here’s how you can do it:
- Create a New Layer: In the Layers panel, click the
New Layericon to create a new layer above your existing ones. This keeps your foam separate and easily adjustable. - Select the Foam Brushes: From your custom brush pack, select a brush designed specifically for painting foam. There are various foam brushes in the pack, so feel free to experiment with different ones to achieve the desired effect.



- Use the Same Color: Set the Foreground color to
#cae5f0,the same color used for the crest. This ensures consistency in your wave’s highlights. - Paint the Foam: Using the selected brush, paint along the crest and the face of the wave to create the appearance of foam. Focus on areas where the water breaks and churns, adding small details to enhance the sense of movement and texture.
By adding foam, your wave will look more dynamic and realistic, capturing the natural beauty of the ocean.
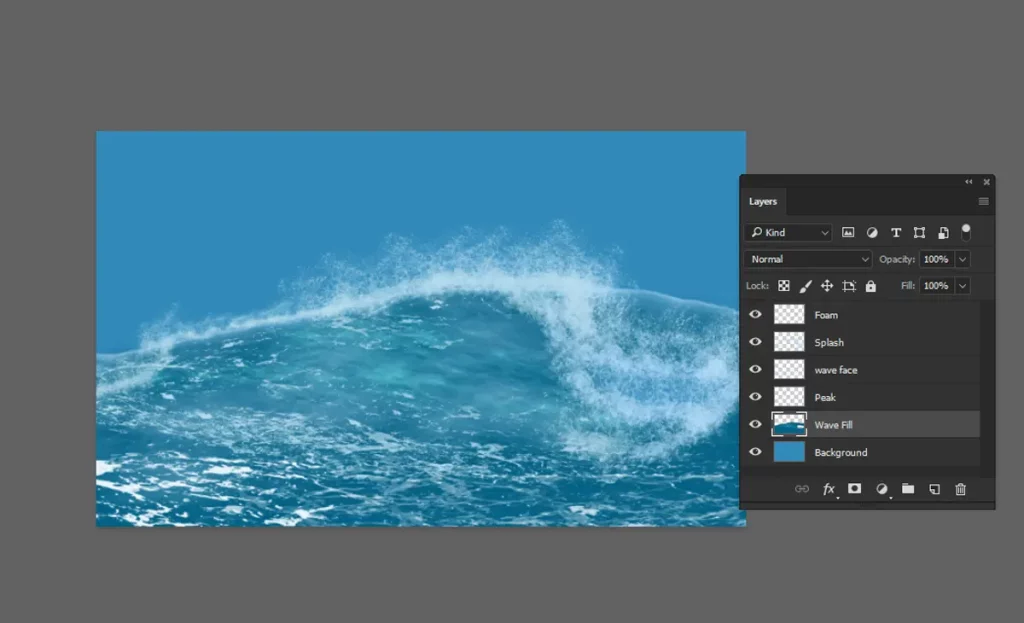
Step 8: Paint the Wave Fill
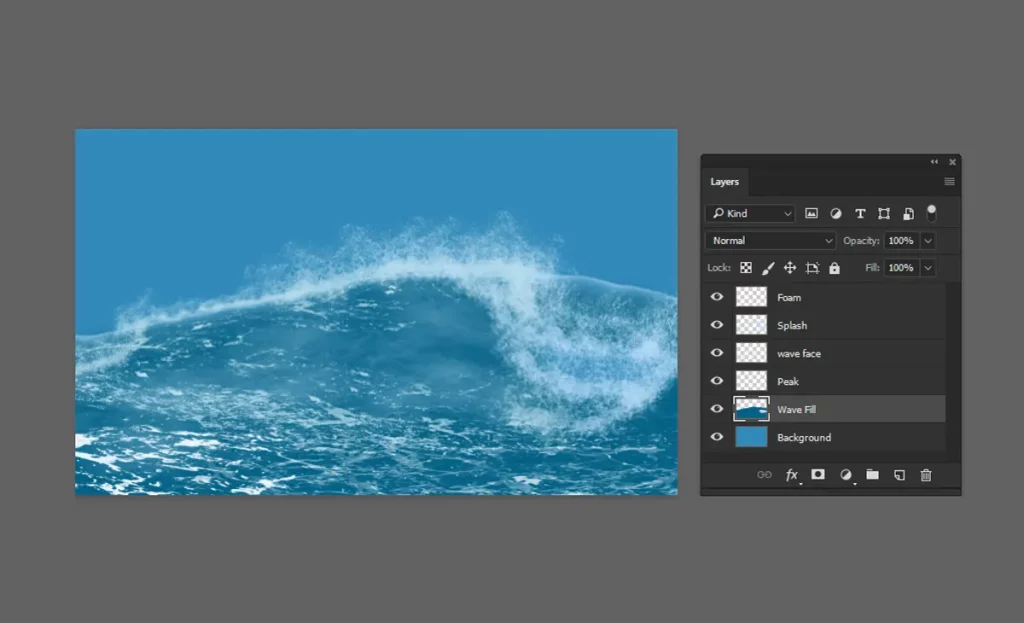
To add more depth and contrast to your wave, we’ll paint the inner wave area. This will help define the wave’s body and enhance its overall look.
- Create a New Layer: In the Layers panel, click the
New Layericon to create a new layer. Drag this layer below the peak layer in the layer stack. - Select the Wave Fill Color: Set the Foreground color to
#036185. This deep Ocean Blue will provide a strong contrast against the highlights of the wave. - Paint the Inner Wave: Using a suitable brush from your custom brush pack, paint the inner wave area. Focus on filling the main body of the wave, following the curves and directions of your initial sketch. This will give your wave a more solid and three-dimensional appearance.
By adding this base color, your wave will have a stronger structure and a striking contrast that highlights the movement and power of the ocean.
Step 9: Paint the Bright Color on the Same Layer
Adding brighter colors can enhance the highlights and make the wave look more dynamic. Let’s paint these highlights to bring out the detail and contrast.
- Select the Face Wave Brush: From your custom brush pack, choose the brush designed for painting the face of the wave.
- Choose the Bright Color: Set the Foreground color to
#38a8bb(Sky Blue). This color will work well to add highlights and make the wave appear more vibrant. - Paint the Bright Highlights: On the same layer where you painted the inner wave, use the face wave brush to add touches of the bright color. Focus on areas that would naturally catch the light, such as the upper parts of the wave’s face and near the crest.
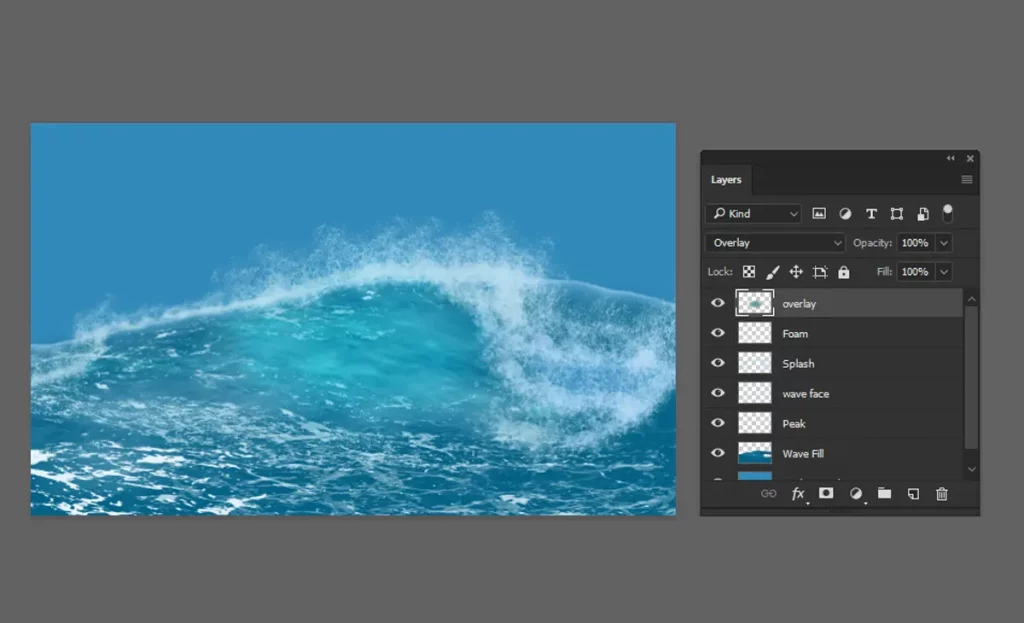
Step 10: Create an Overlay Layer to Lighten the Area
To enhance the lighting and add a more dynamic look to your wave, we’ll use an overlay layer. This will make certain areas appear lighter and more vibrant.
- Create a New Layer: In the Layers panel, click the
New Layericon to create a new layer above your existing layers. - Set the Layer Mode to Overlay: Change the blending mode of this new layer to
Overlay. This will allow the colors you paint to blend with the layers below, creating a lighter and more natural effect. - Choose the Overlay Color: Set the Foreground color to
#5c9a9f. This Soft Aqua color will help to brighten the wave areas without overwhelming the existing colors. - Paint the Lighter Areas: Using a soft brush, gently paint over the areas of the wave where you want to add more light. Focus on the parts of the wave that naturally catch the most light, such as the peaks and the face of the wave. This will add a luminous effect and make the wave appear more dynamic.
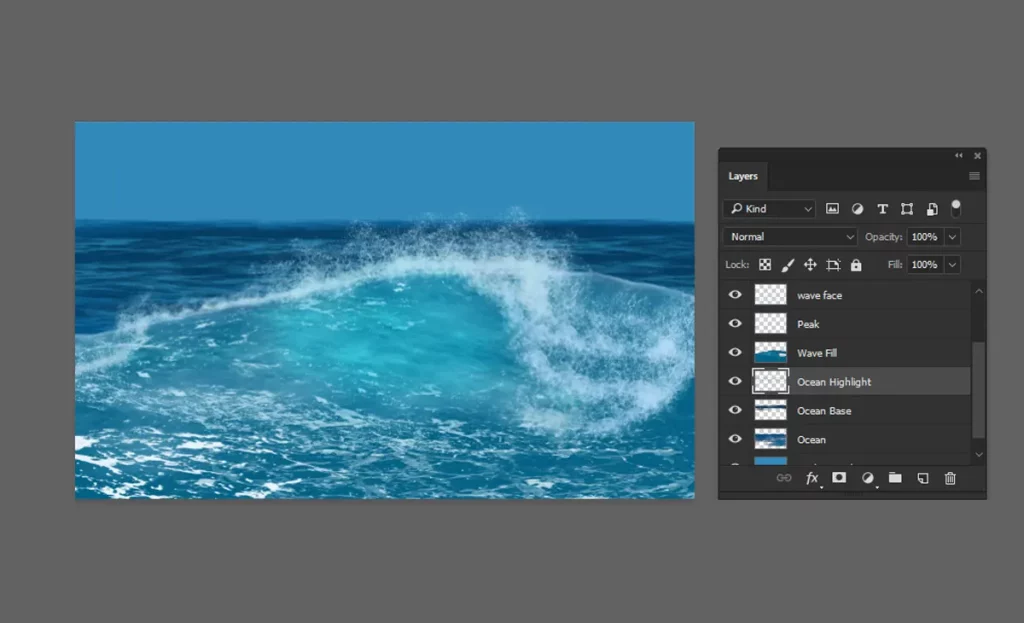
Step 11: Paint the Ocean
To complete your ocean scene, we’ll paint the vast expanse of the ocean using a base color and highlight color to add depth and dimension. For detailed guidance on painting the ocean, be sure to read our article “How to Paint the Ocean.“
- Create a New Layer: In the Layers panel, click the
New Layericon to create a new layer. This will ensure that your ocean painting remains separate from the wave details. - Choose the Base Color: Set the Foreground color to
#053d62. - Paint the Base Layer: Using a large, soft brush, paint the entire ocean area with the base color. This will create a solid foundation for your ocean.
- Select the Highlight Color: Change the Foreground color to
#20749c. This color will add highlights and enhance the overall depth of your ocean.
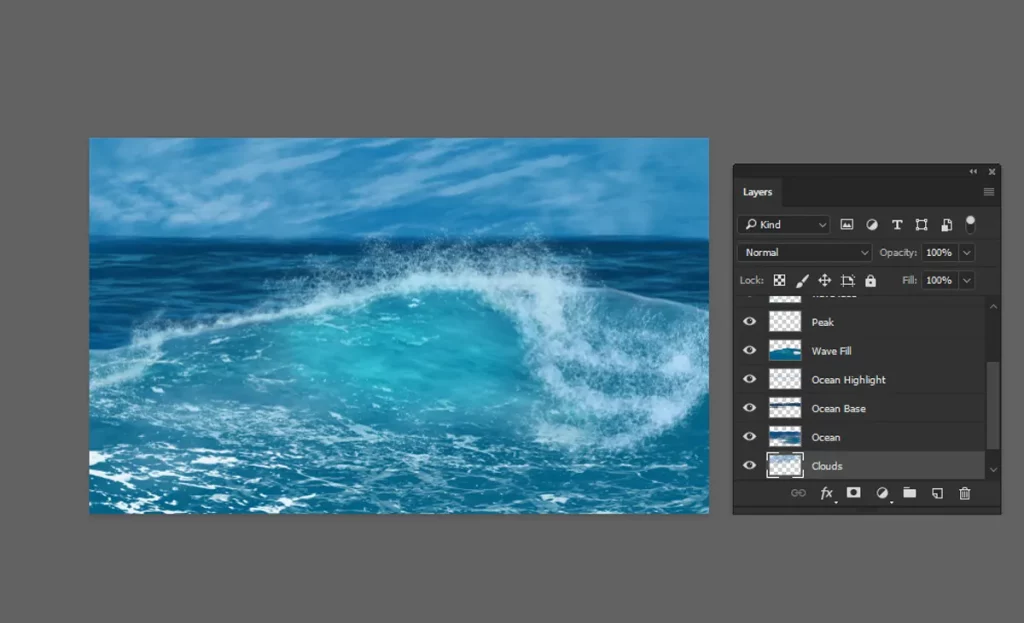
Step 12: Paint the Clouds
Adding clouds to your scene can create a more dynamic and atmospheric composition. Here’s how you can paint clouds in Photoshop:
- Create a New Layer: In the Layers panel, click the
New Layericon to create a new layer above your existing layers. This will ensure that your clouds are separate from the ocean and waves. - Choose the Cloud Color: Set the Foreground color to
#69add9. will give your clouds a light and airy appearance. - Select a Cloud Brush: From your brush pack, select a brush designed for painting clouds. Cloud brushes are typically soft and fluffy, allowing you to create realistic cloud shapes.
- Paint the Clouds: Using the selected brush, gently paint the clouds in the sky area of your canvas. Start with broad strokes to define the overall shape of the clouds, then add smaller, detailed strokes to create texture and depth.
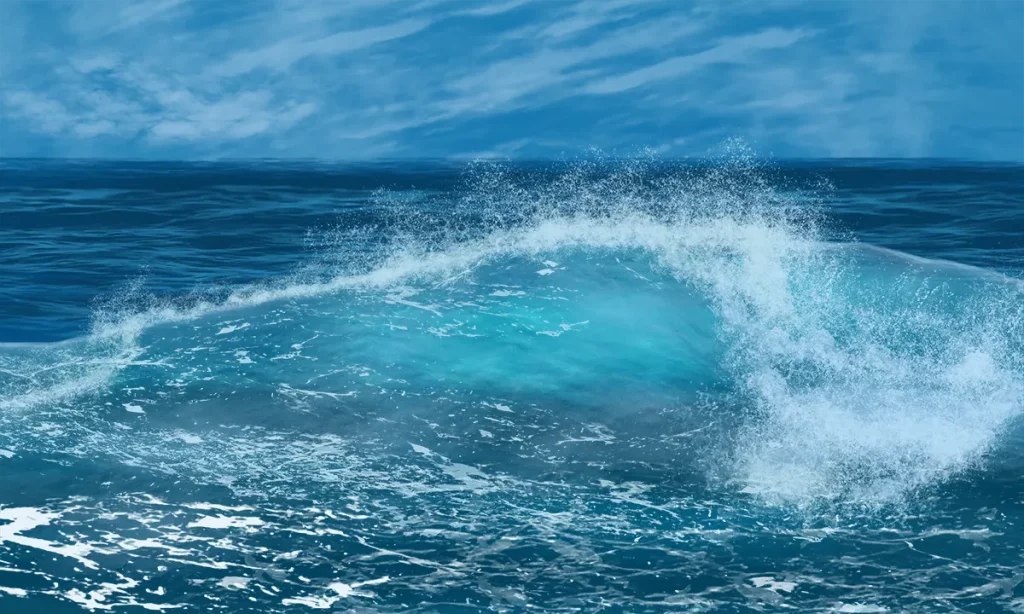
For detailed guidance on painting clouds, be sure to read our article “How to Paint Clouds in Photoshop“.
How to Paint Clouds in Photoshop Using Custom Brushes

How to Paint Clouds in Photoshop Using Custom Brushes
Introduction
Creating realistic clouds in Photoshop can elevate your digital art to a new level. In this tutorial, we’ll guide you through the process of painting clouds using custom brushes. Whether you’re a beginner or an experienced artist, these techniques will help you achieve stunning results.
Step 1: Choosing the Right Brush
- Download My Brush Set: Click here to download the custom cloud brushes.
- Load the Brush: Open Photoshop, go to the Brush tool (B), click on the brush preset picker, and select “Load Brushes” to add your new cloud brushes.
- Choosing the Right Brush To paint clouds, custom brushes are essential. You can choose from our exclusive brush set, which offers a variety of cloud brushes to suit your needs:
Step 2: Setting Up Your Canvas
Start by opening Photoshop and creating a new document.
Set your dimensions according to your project needs. A good starting point is 2500x1520 pixels with a resolution of 300 DPI.
Step 3: Preparing the Background
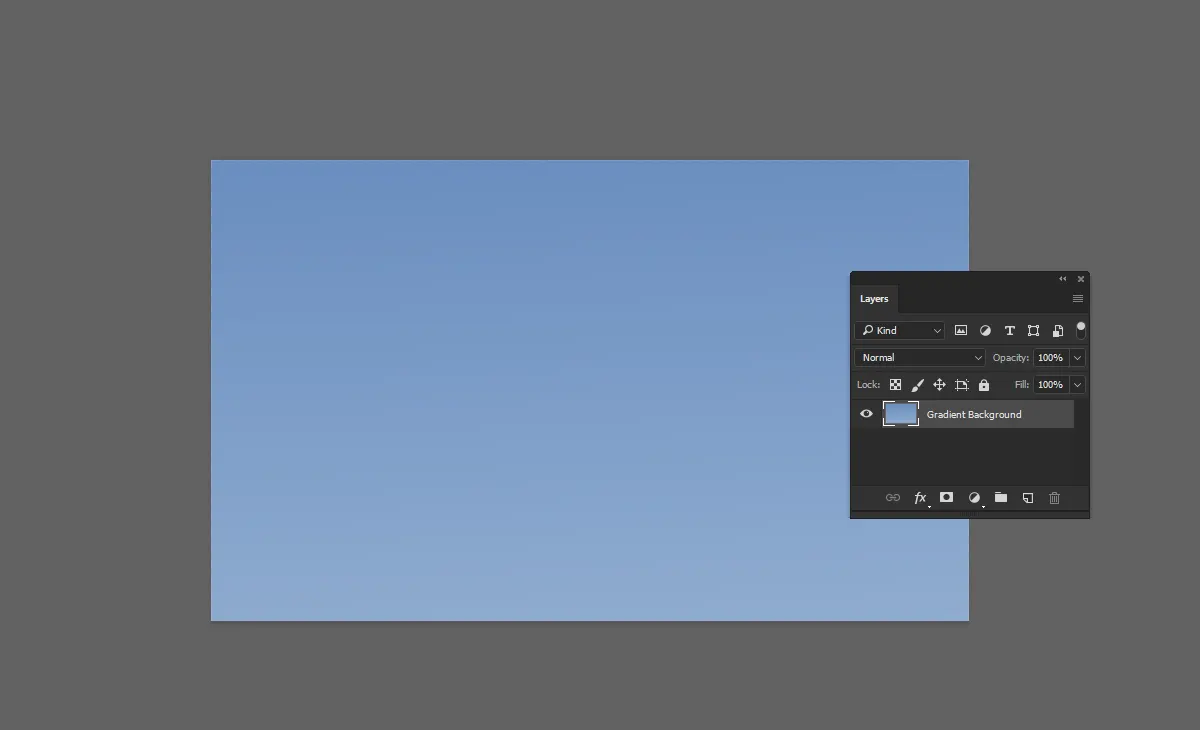
Before painting the clouds, prepare a suitable background. A gradient sky works great:
- Create a New Layer: Open Photoshop and create a new layer for the gradient background.
- Select the Gradient Tool: Choose the Gradient tool (G) from the toolbar.
- Choose Your Colors: Set your gradient to transition between the colors
#5a81b8and#8ca9ce. - Apply the Gradient: Click and drag from the top to the bottom of your canvas to apply the gradient, creating a beautiful sky backdrop for your clouds.
Here’s the result.
Different Examples of Results with Our Cloud Brush Set Using our custom cloud brush set, you can achieve a variety of cloud styles. Here are a few examples:

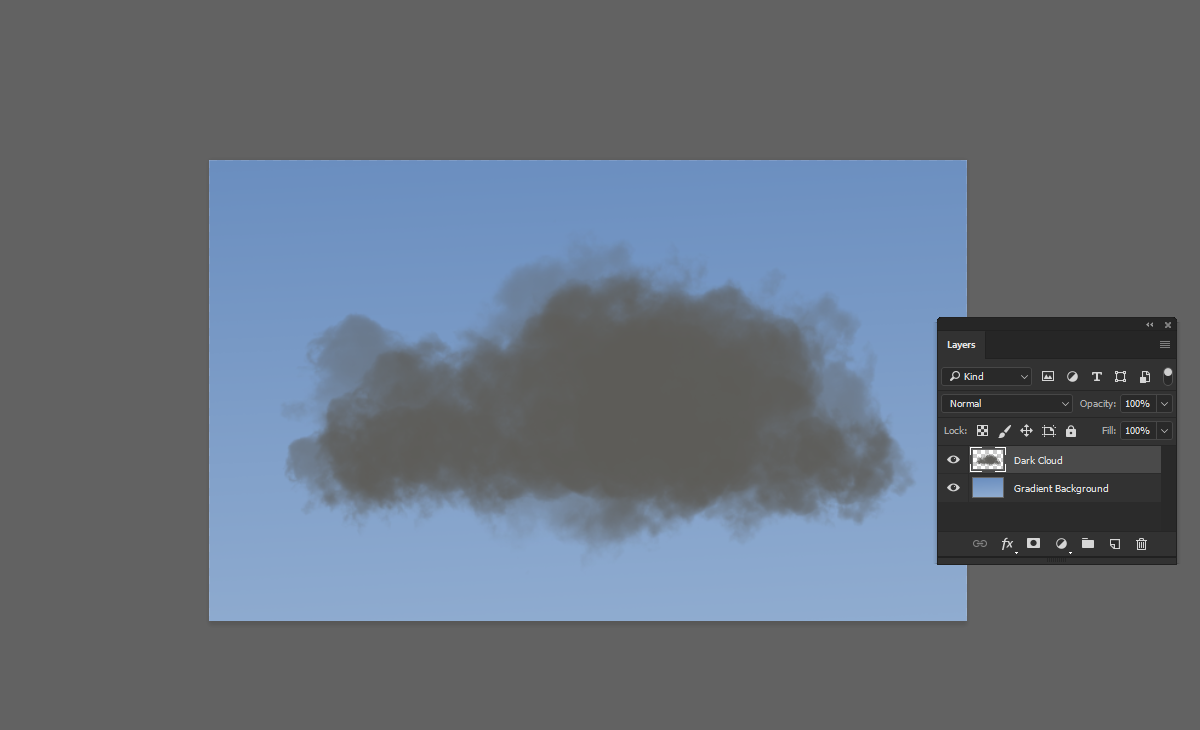
Step 4: Painting the Shadow of the Clouds
To create realistic shadows for your clouds:
- Set the Foreground Color: Change your foreground color to
#5d5c58. - Paint the Shadows: paint the shadow areas of your clouds. Focus on the lower parts and the areas that would naturally be darker.
Step 5: Painting the Light of the Clouds
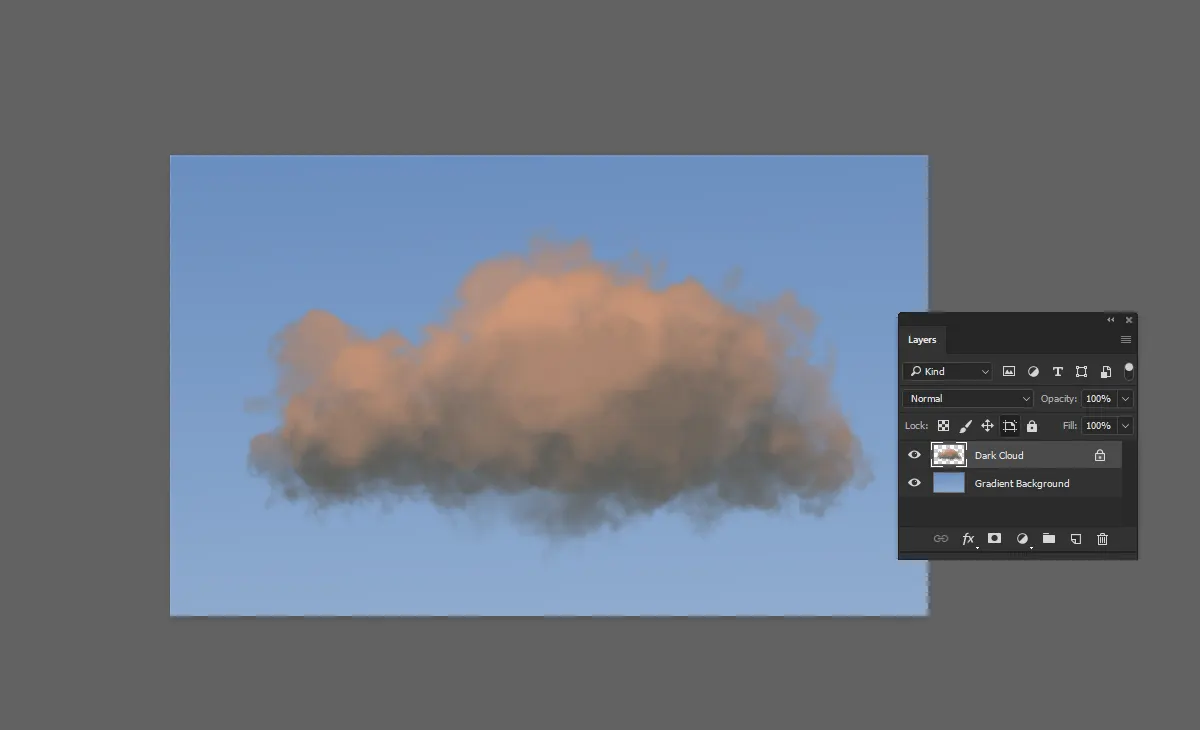
For adding highlights and enhancing the depth:
- Disable Auto-Nesting: Ensure that “Prevent Auto-Nesting into and out of Artboards” is selected.
- Set the Foreground Color: Change your foreground color to
#eaac8a. - Paint the Highlights: Using the same brush, paint the light areas of your clouds. Focus on the top and areas that catch the lightest to create inner shadows.
Step 6: Creating Highlights for the Clouds
To add highlights:
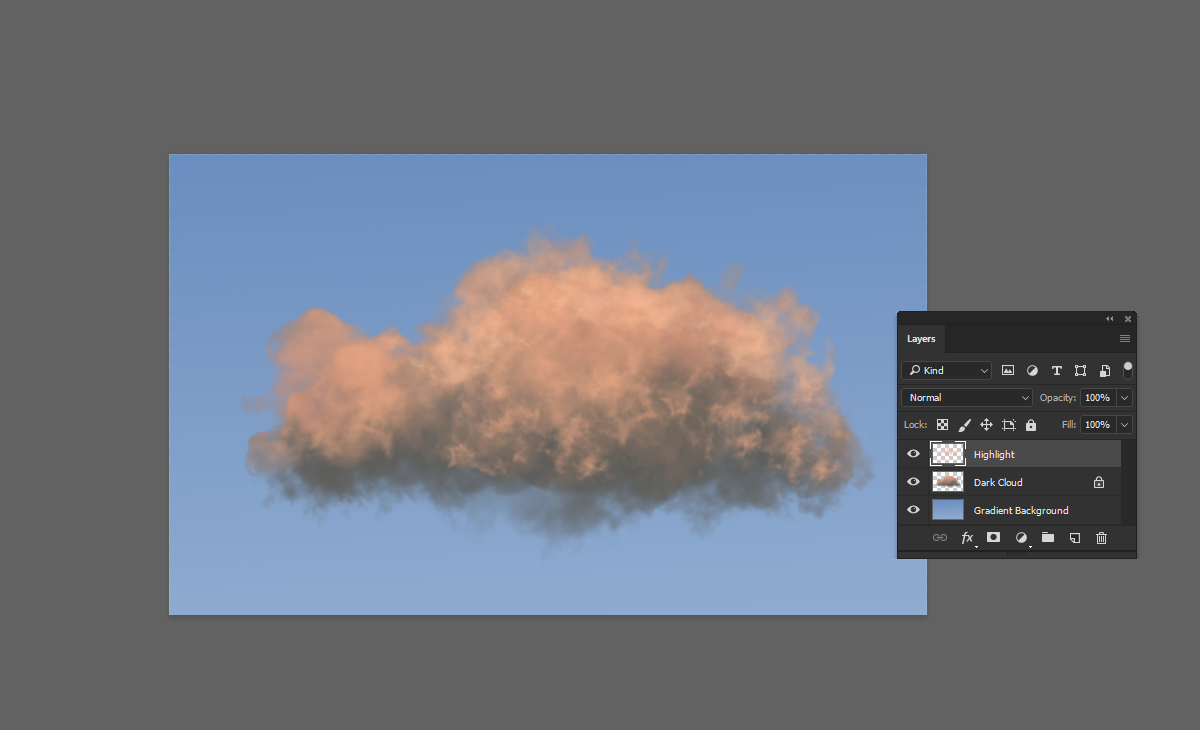
- Create a New Layer: Add a new layer and name it “Highlight”.
- Set the Foreground Color: Change your foreground color to
#f9ccab. - Paint the Highlights: paint the highlights on the top and edges of your clouds. This will add a glowing effect and enhance the realism.
Step 7: Adding a Second Layer of Highlights
To enhance the highlights even more:
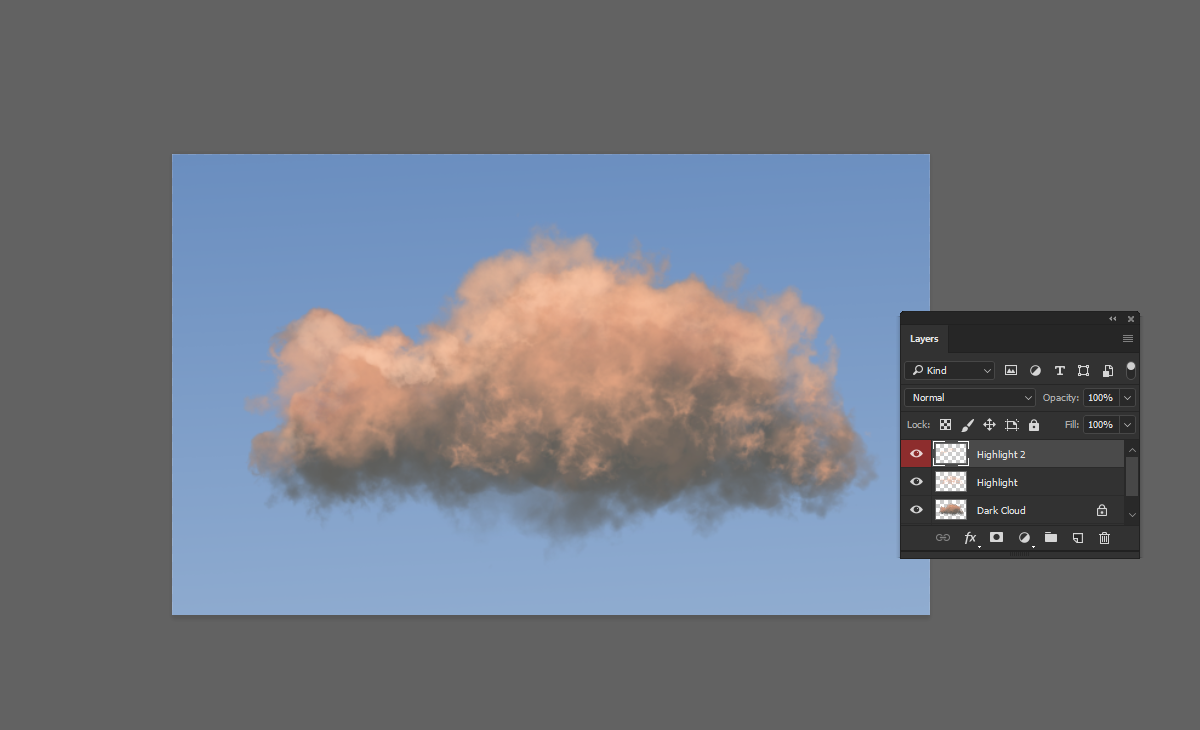
- Create a New Layer: Add a new layer and name it “Highlight 2”.
- Set the Foreground Color: Change your foreground color to
#f9cdac. - Paint the Second Layer of Highlights: gently paint additional highlights. Focus on the areas that you want to stand out the most, enhancing the glow and depth of your clouds.
With this step, your clouds should have a beautiful, layered effect with realistic lighting and shadows.
Step 8: Adding Directional Light Highlights
To define the direction of the light and add depth:
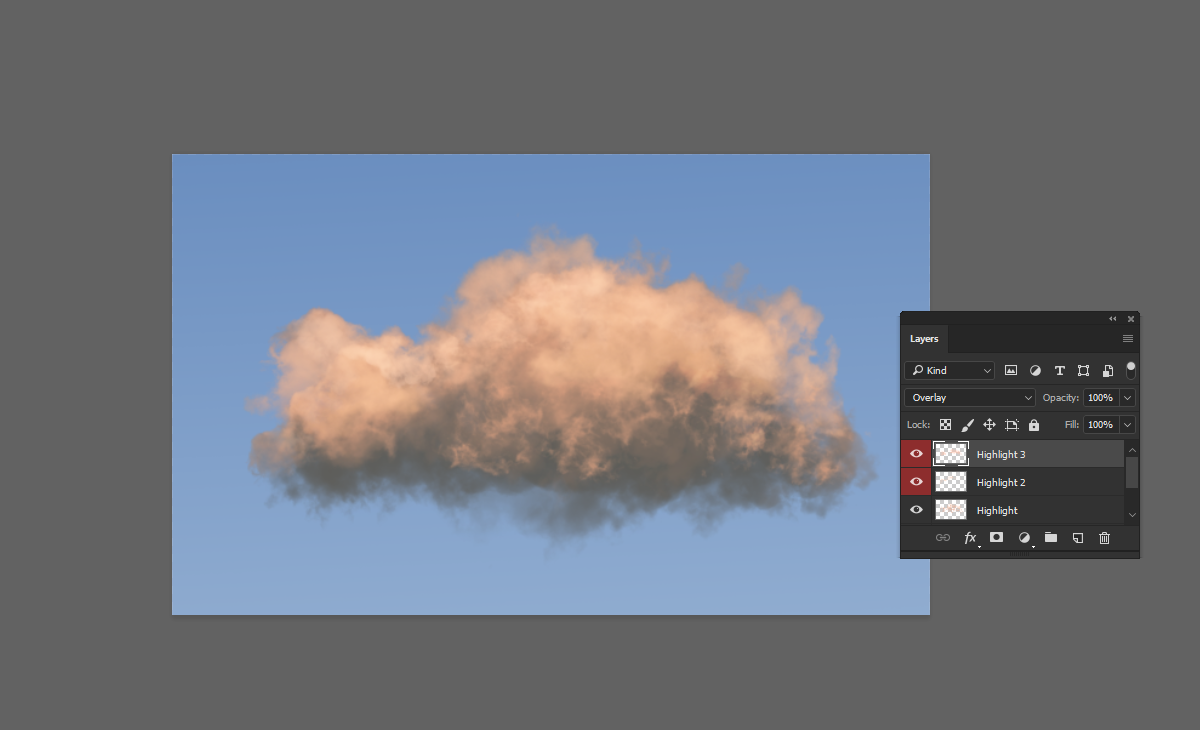
- Create a New Layer: Add a new layer and name it “Highlight 3”.
- Set the Foreground Color: Change your foreground color to
#f1b099. - Set Layer Mode to Overlay: Change the blending mode of this layer to “Overlay”.
- Paint the Highlights: paint the areas where the light would naturally hit. This will create a realistic direction of light and enhance the overall effect of your clouds.
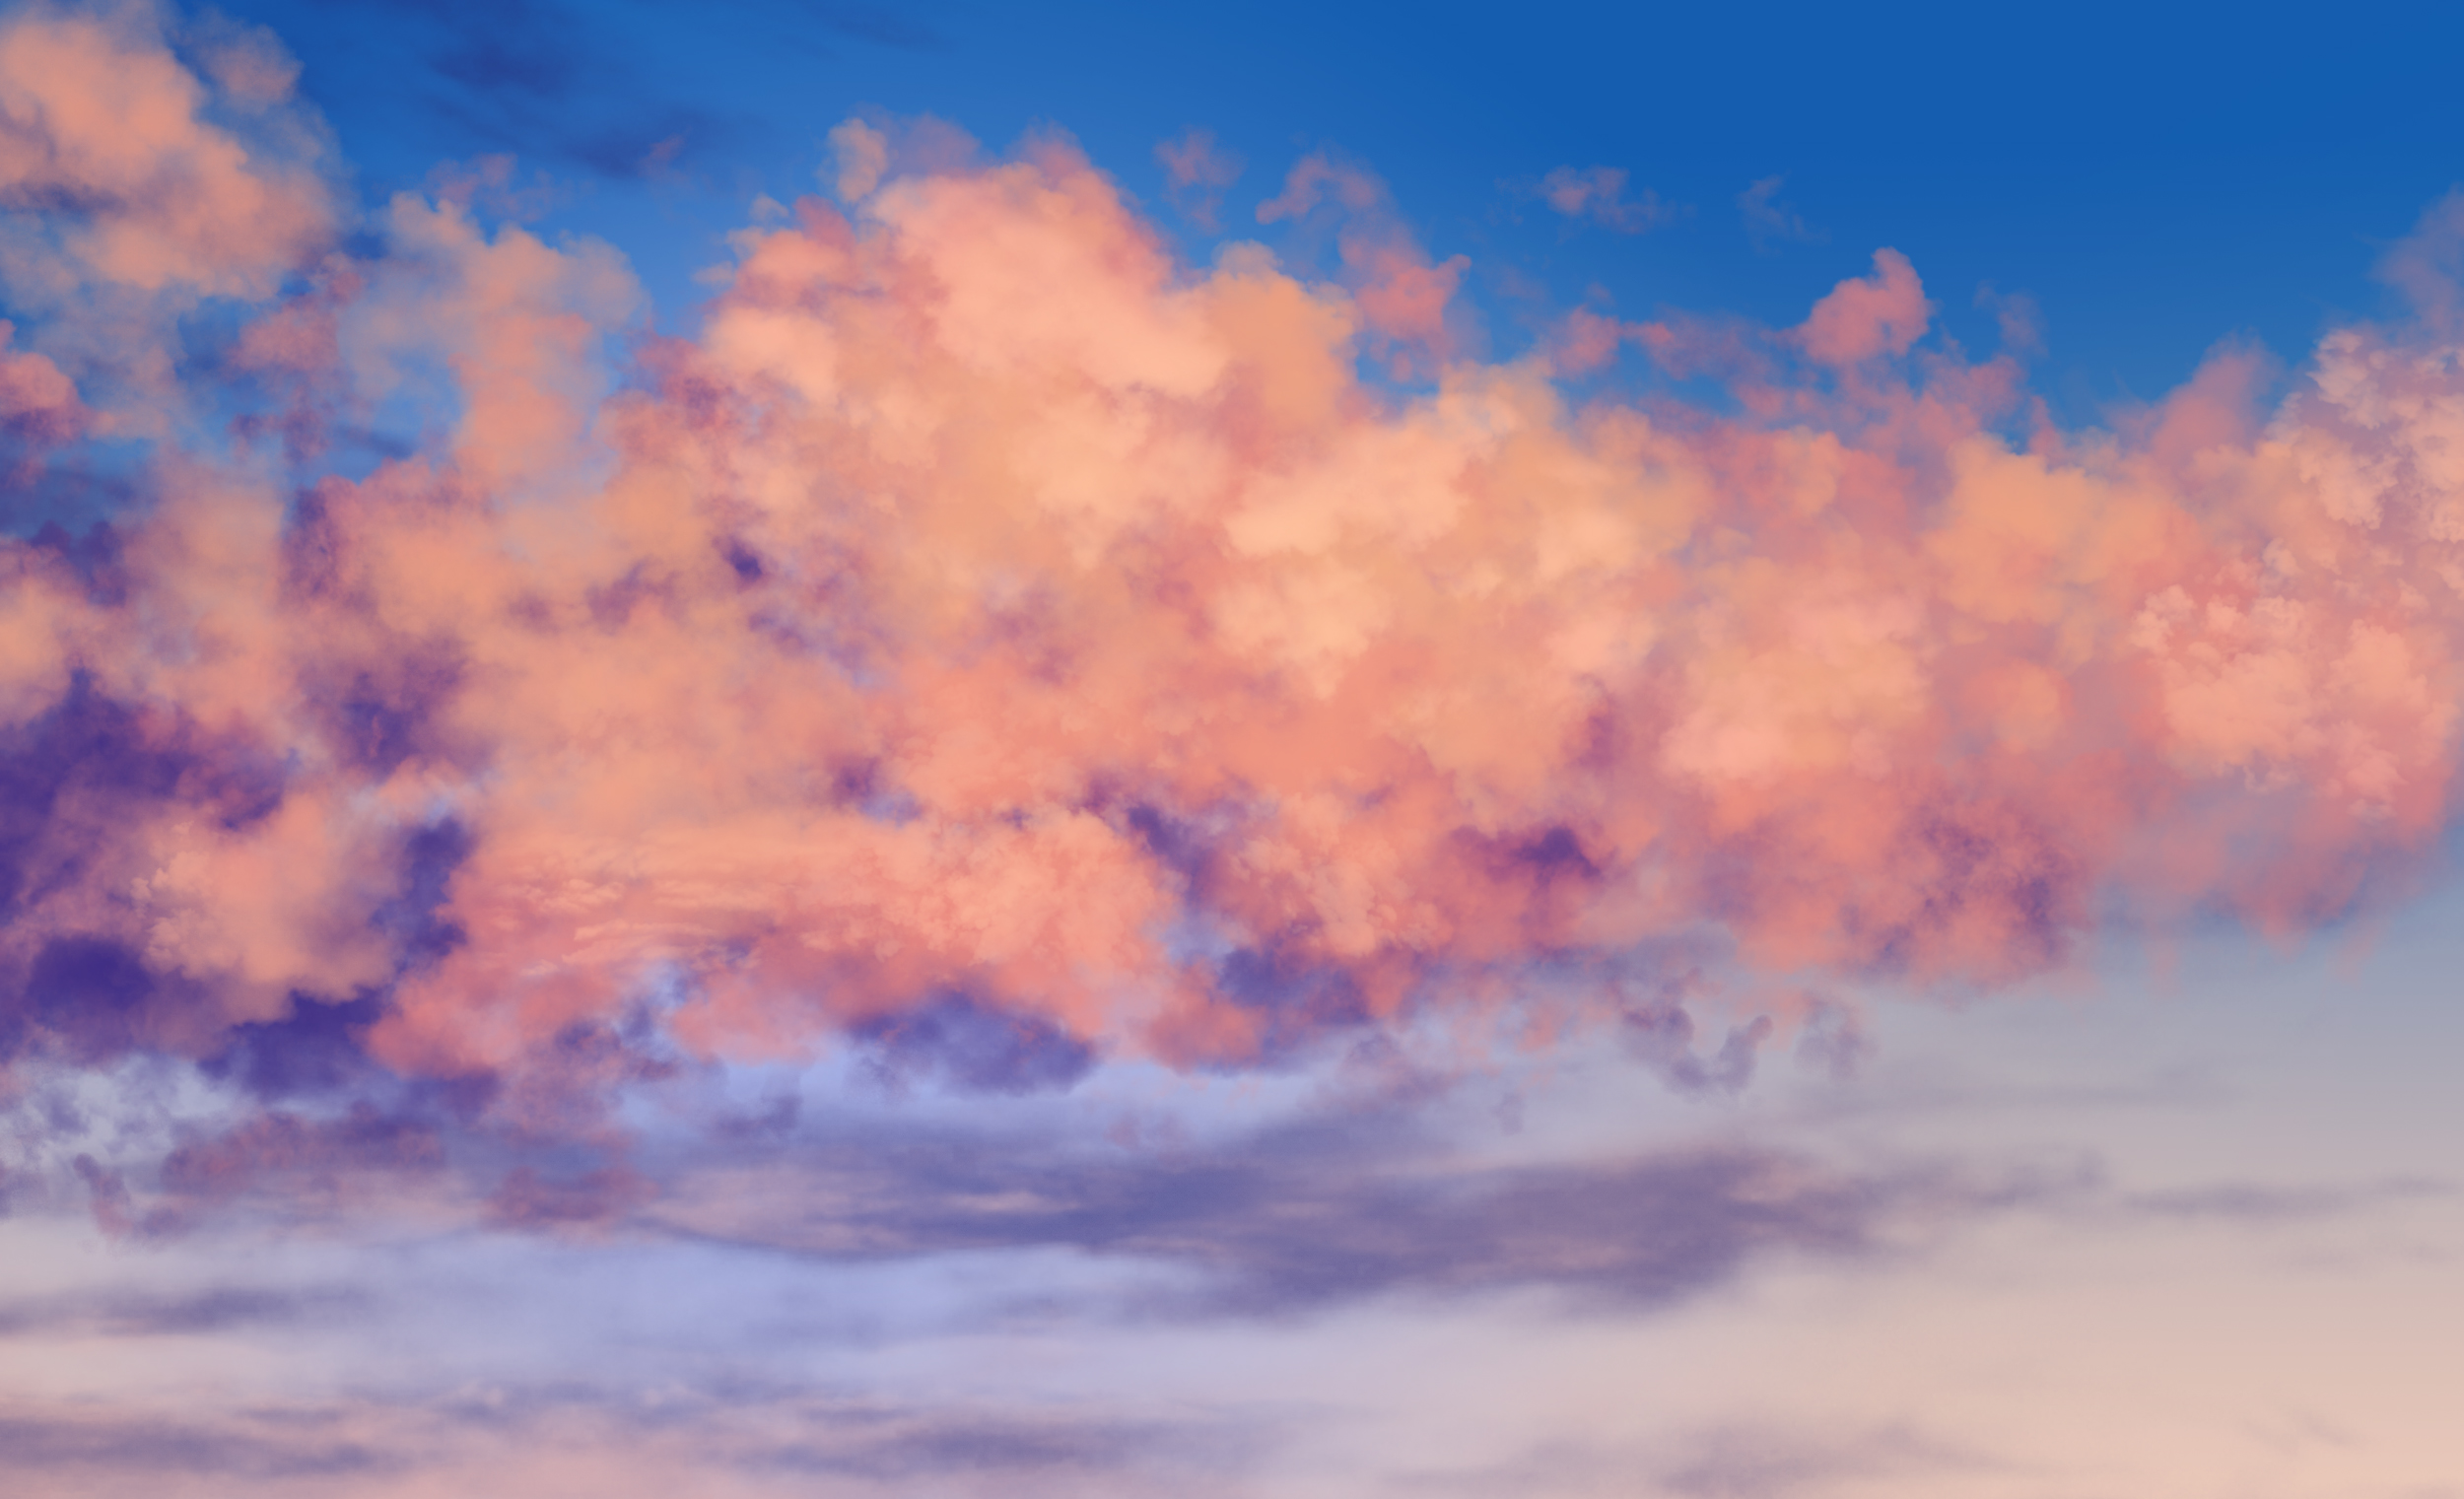
Check out these stunning examples created using our Cloud Brushes Vol. 3.
You can get them and start creating your own masterpieces!
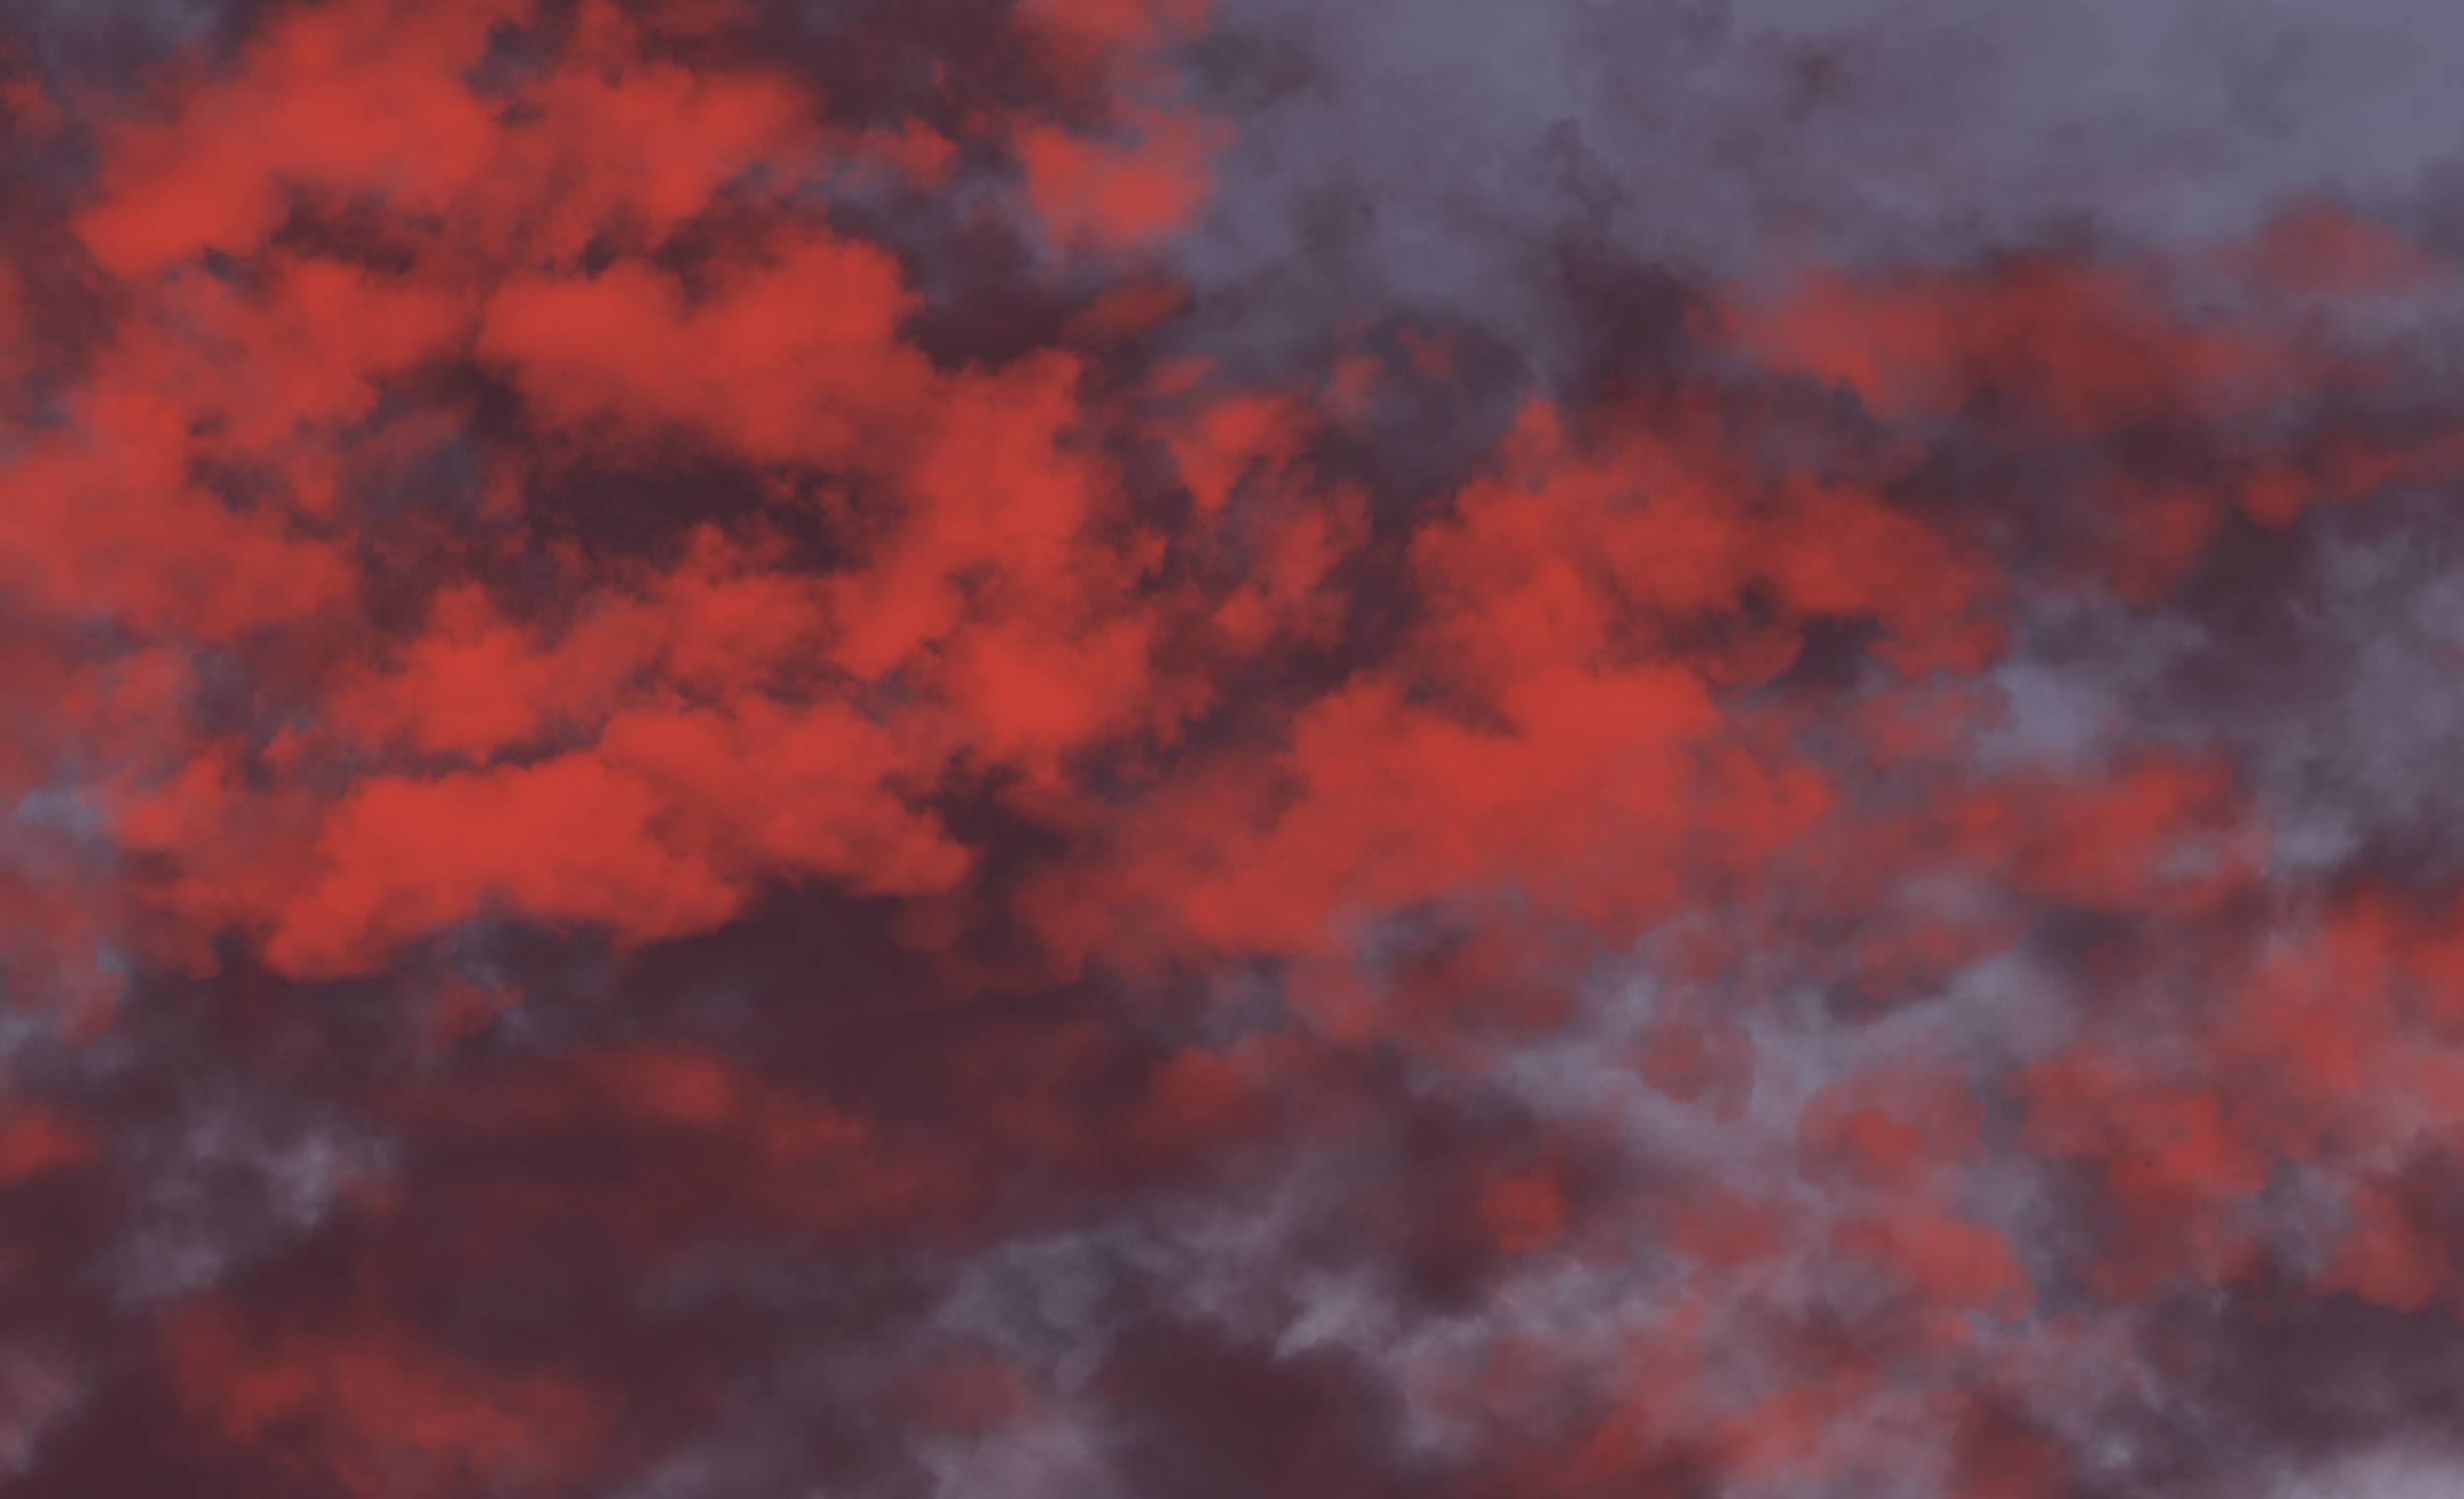
We hope you enjoyed this tutorial and found it helpful.
Happy creating!
How to Import Swatches in Photoshop

How to Import Swatches in Photoshop
Introduction
Swatches are an essential tool for any designer, providing a convenient way to maintain color consistency throughout your projects. Importing swatches in Photoshop allows you to quickly access your favorite color palettes. In this tutorial, we’ll walk you through the steps to import swatches in Photoshop.
Step 1: Prepare Your Swatch File
Before importing, ensure you have your swatch file ready.
Swatches are usually saved in. ASE (Adobe Swatch Exchange) or. ACO (Adobe Color) formats.
Step 2: Open Photoshop
Launch Photoshop and open any document or create a new one.
This will ensure the workspace is active and ready for importing swatches.
Step 3: Access the Swatches Panel
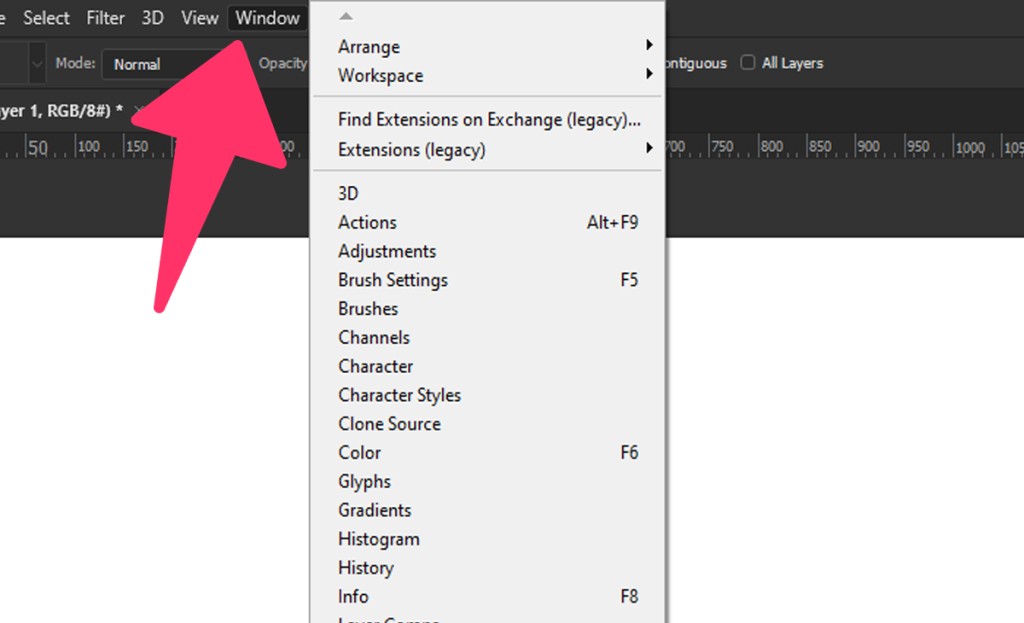
Open the Swatches Panel: Go to “Windows” in the top menu.
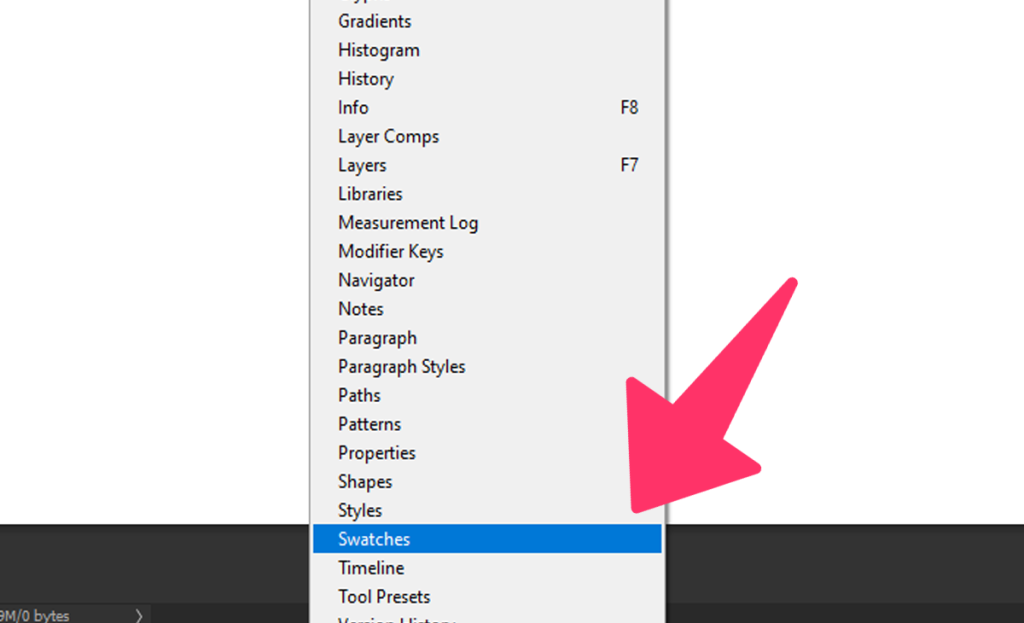
Select “Swatches” from the Windows menu.
Step 4: Import Swatches
Open Swatch Panel Menu: Click on the menu icon (three horizontal lines) in the top-right corner of the Swatches panel.
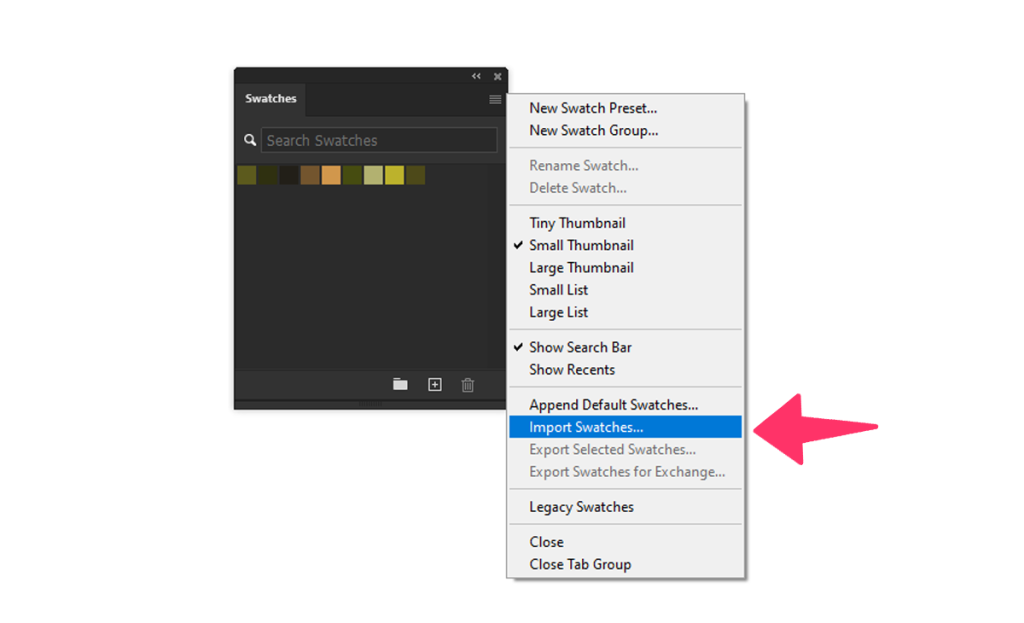
From the drop-down menu, select “Import Swatches.”
Locate Your Swatch File: Navigate to the folder where your swatch file is saved, select it, and click “Open.”
Step 5: Organize Your Swatches
Create a Group of Colors: Select multiple swatches by holding down the Shift key and clicking on the colors you want to group.
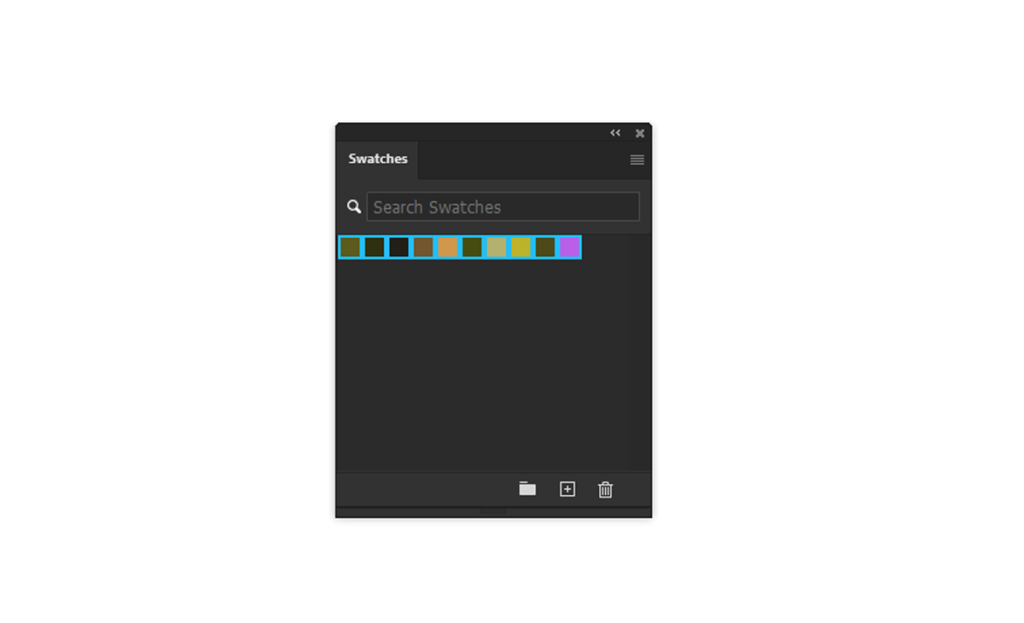
Then, click on the “Create New Group” icon (folder icon) in the Swatches panel to group them together.
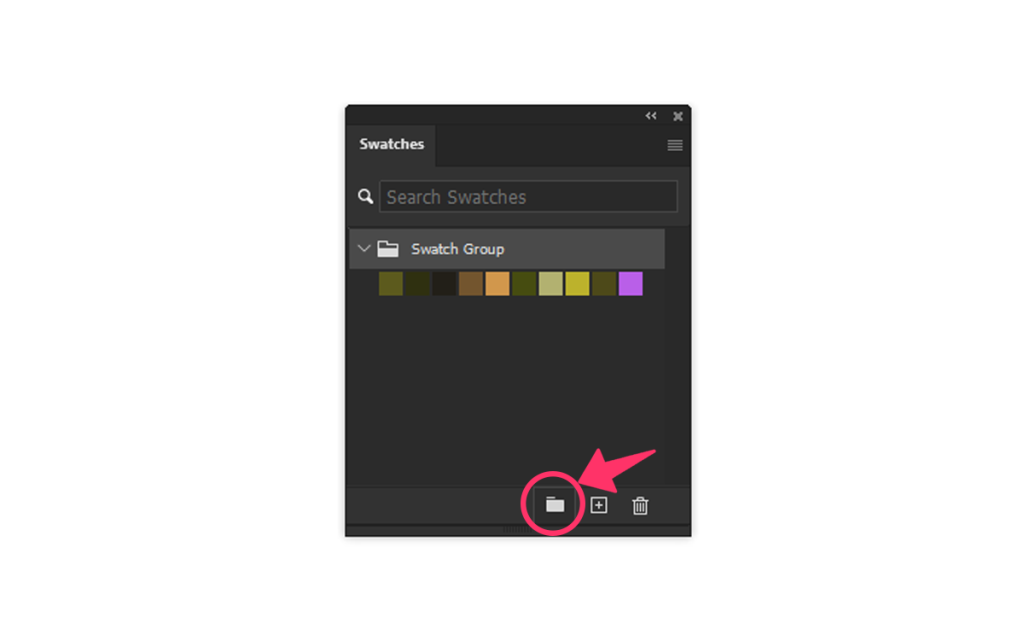
Create a New Group of Swatches: Click on the “Create New Group” icon in the Swatches panel to create a new swatch group.
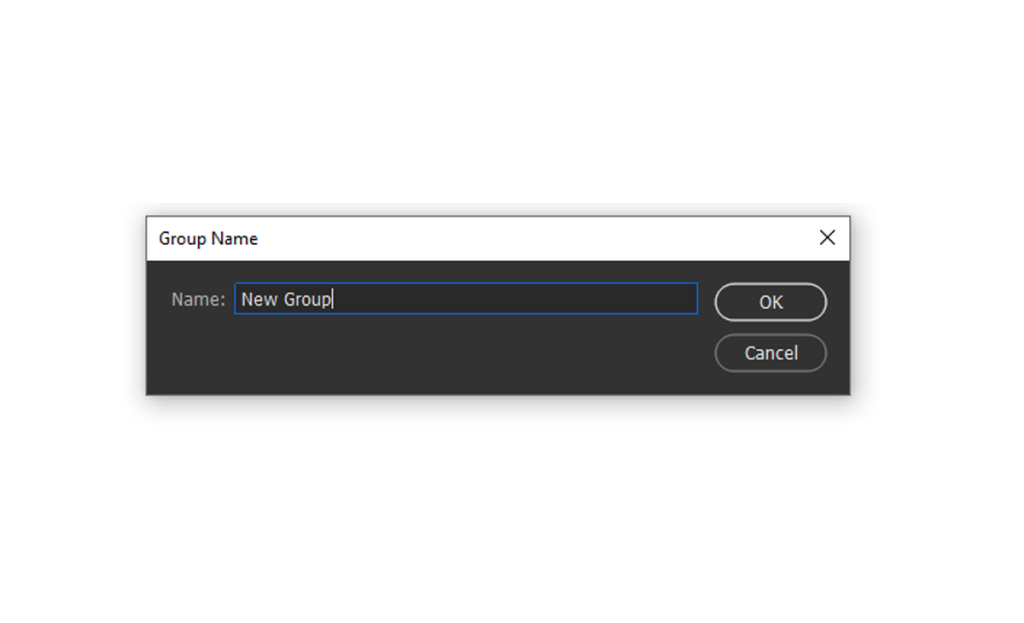
You can name this group and drag individual swatches into it for better organization.
Step 6: Add a Color from the Color Picker to Swatches
Select the Color Picker: Click on the Foreground Color in the toolbar to open the Color Picker.
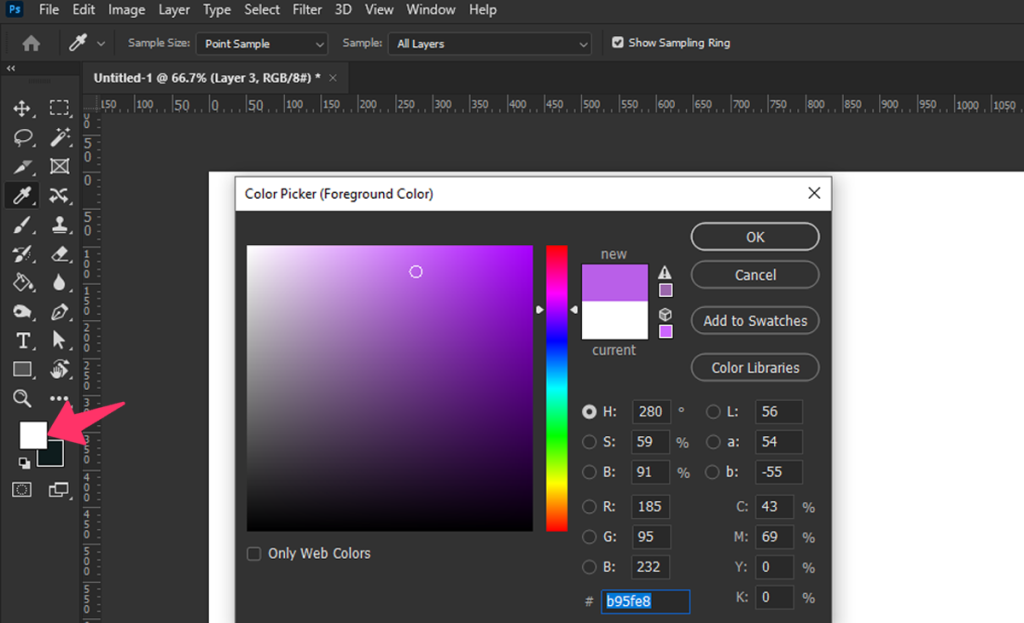
Choose Your Color: Select the color you want to add to your swatches.
Add to Swatches: Once you’ve chosen your color, click the “Add to Swatches” button.
A dialog box will appear where you can name your new swatch.
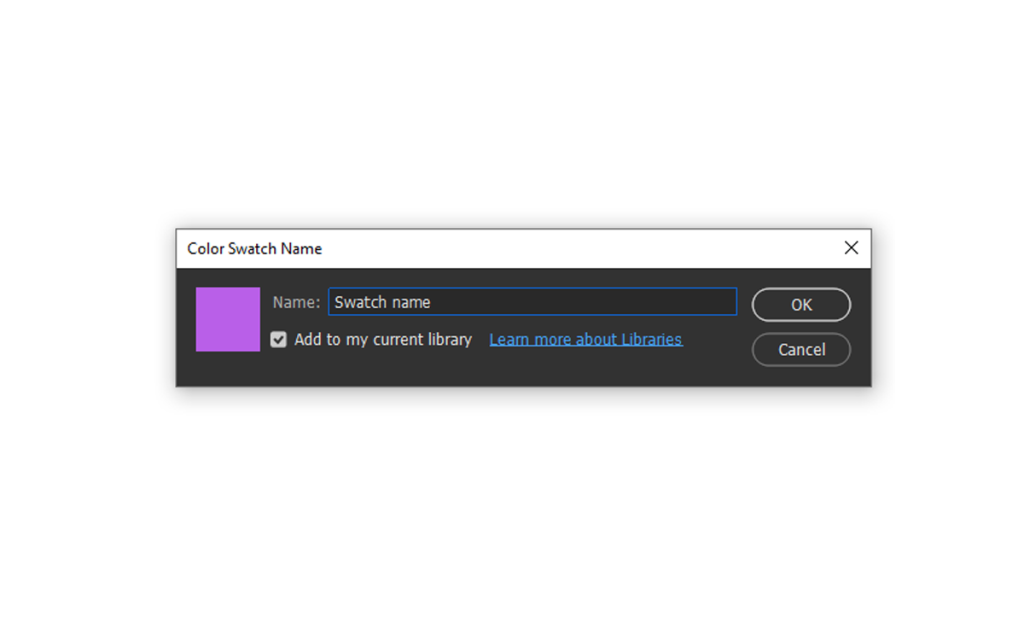
Confirm and Save: Click “OK” to add the new color to your swatches panel.
Step 7: Export Your Swatches
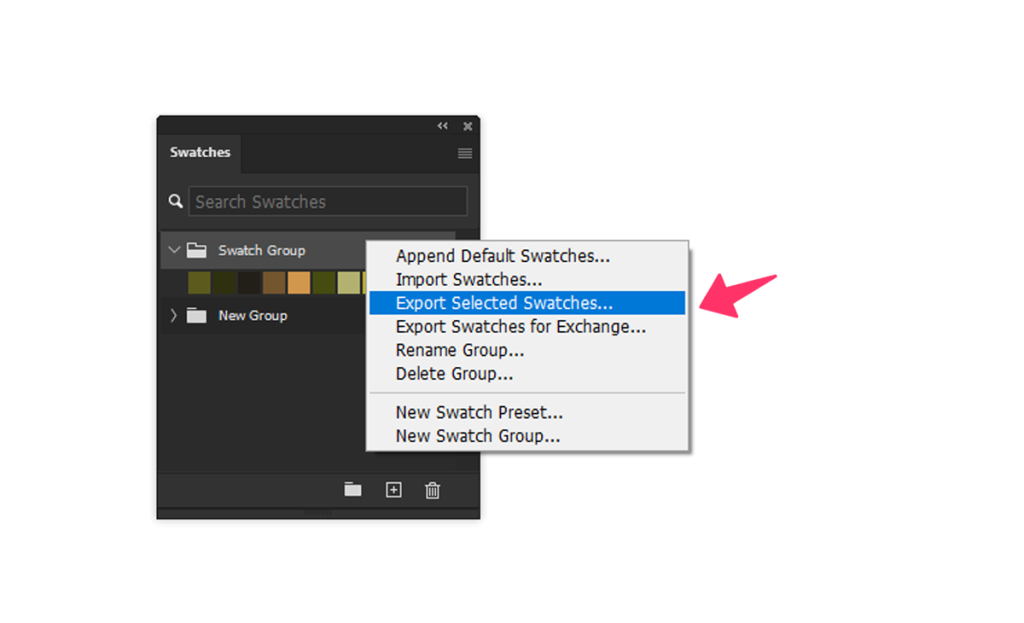
- Open Swatch Panel Menu: Click on the menu icon (three horizontal lines) in the top-right corner of the Swatches panel.
- Select “Export Swatches”: From the drop-down menu, select “Export Swatches.”
- Choose File Format: Select the desired file format, such as. ASE (Adobe Swatch Exchange) or. ACO (Adobe Color).
- Save the File: Choose the location where you want to save your swatch file, name it, and click “Save.”
Conclusion
Importing swatches in Photoshop is a straightforward process that can greatly enhance your workflow.
By keeping your color palettes organized and easily accessible, you can maintain consistency and efficiency in your design projects. Experiment with different swatch files to find the perfect palette for your next masterpiece.
Explore our store for a variety of design tools and resources that can elevate your projects. From custom brushes to unique swatches, we have everything you need to bring your creative vision to life.
Happy designing!
How to Install ABR Brushes in Affinity Photo

How to Install ABR brushes in Affinity Photo.
Introduction
Affinity Photo is a powerful photo editing software that supports various brush formats, including ABR (Adobe Brush) files. This guide will walk you through the steps to import and use ABR brushes in Affinity Photo, enhancing your digital artwork and photo editing capabilities.
Step 1: Download the ABR Brush File
Start by downloading the ABR brush file you want to use. Make sure to save it in an easily accessible location on your computer, such as the Downloads folder.
Step 2: Open Affinity Photo
Launch Affinity Photo on your computer. Ensure that you have the latest version of the software for optimal compatibility with ABR files.
Step 3: Access the Brushes Panel
To begin importing your brushes:
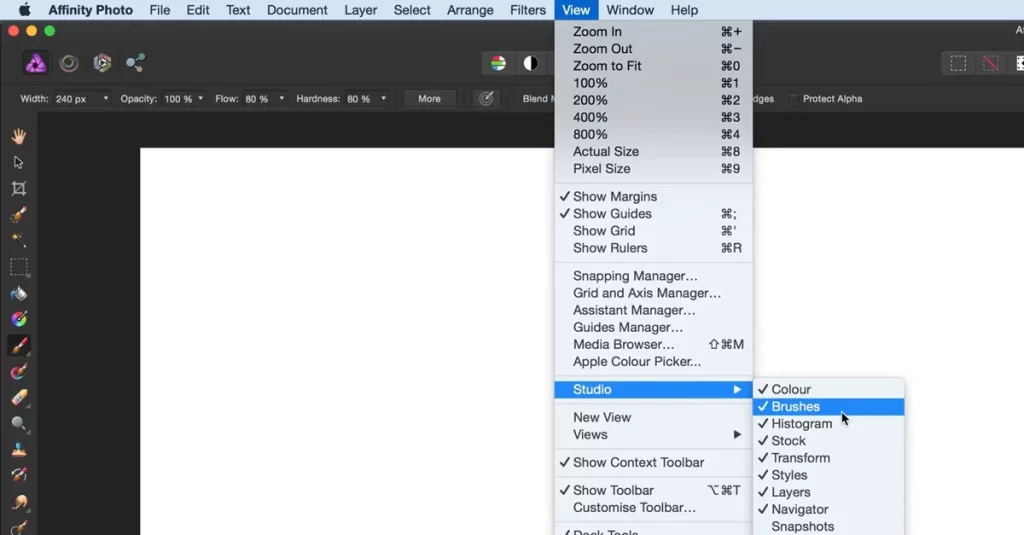
- Go to the View menu.
- Select Studio, then click on Brushes to open the Brushes Panel.
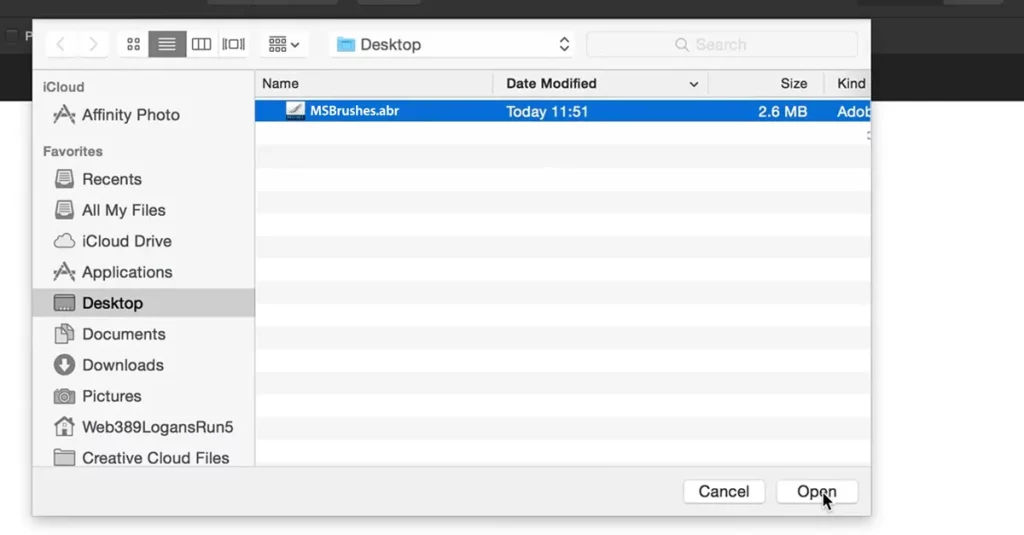
Step 4: Import the ABR Brushes
Follow these steps to import the ABR file:
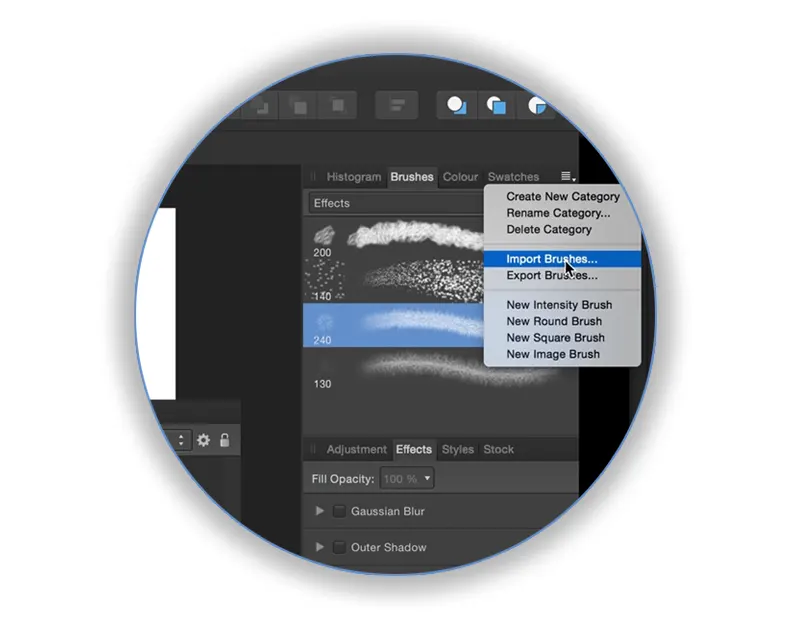
- In the Brushes Panel, click on the Menu icon (three horizontal lines) at the top right corner.
- Select Import Brushes from the dropdown menu.
- Navigate to the location where you saved the ABR file.
- Select the ABR file and click Open. Affinity Photo will import the brushes into your Brushes Panel.
Conclusion
Installing ABR brushes in Affinity Photo is a straightforward process that greatly expands your creative possibilities.
By following these steps, you can easily import and use a variety of brushes to enhance your digital artwork and photo editing projects. Happy creating!
Learn how to import ABR brushes into Photoshop / How to import ABR Brushes into Procreate /How to Install ABR Brushes in GIMP
How to import ABR Brushes into Procreate

Import ABR brushes into Procreate
Step 1: Explore and Download Our Brushes
To begin your creative journey, you’ll need to find and download the ABR brushes you’d like to use. You can explore our extensive collection of high-quality brushes here. Once you’ve found the perfect set, download the ABR file to your device.
Step 2: Locate the ABR File
Once you’ve downloaded the ABR file, locate it on your device. If you’re using a computer, you may need to transfer the file to your iPad via cloud storage (such as iCloud, Dropbox, or Google Drive) or using AirDrop.
Step 3: Open Procreate
Launch the Procreate app on your iPad. Ensure you have the latest version of Procreate for the best experience and compatibility with ABR files.
Step 4: Import the Brushes
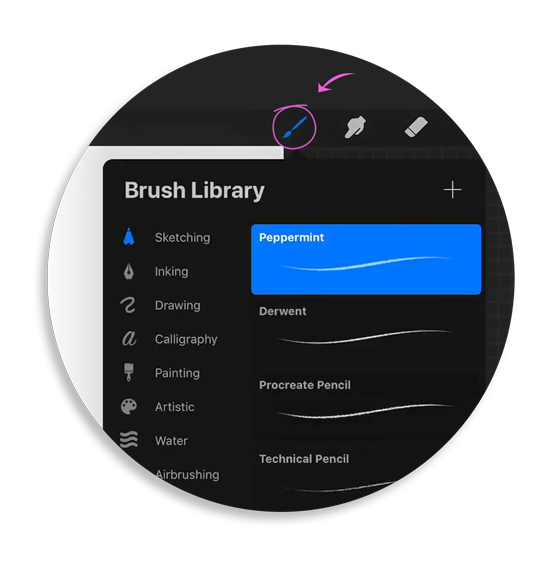
- Open your Procreate canvas or create a new one.
- Tap on the Brush icon to open the Brush Library.
- At the top right corner of the Brush Library, tap on the + symbol to create a new brush set.
- Tap on the newly created brush set to open it.
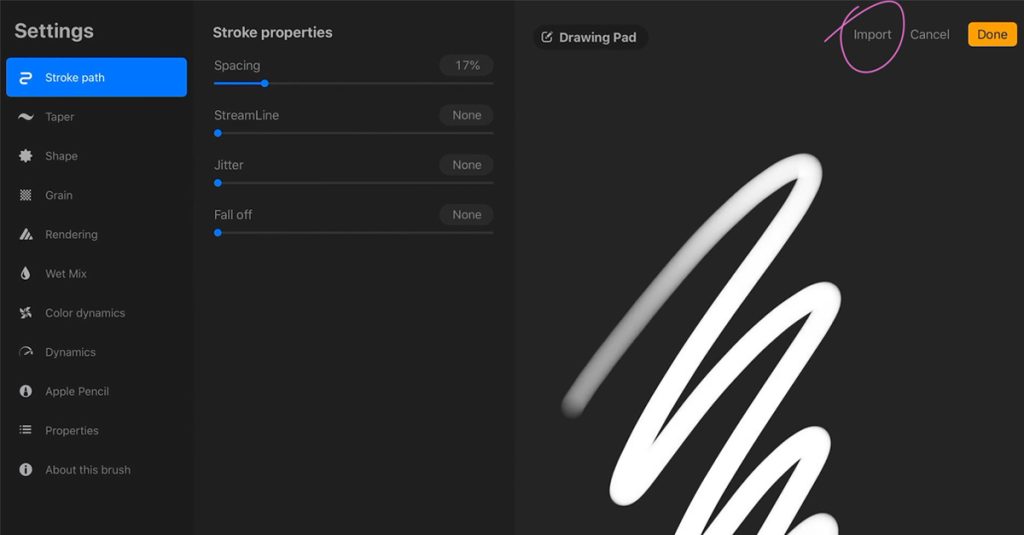
- Now, tap on the Import button located at the top right of the brush set panel.
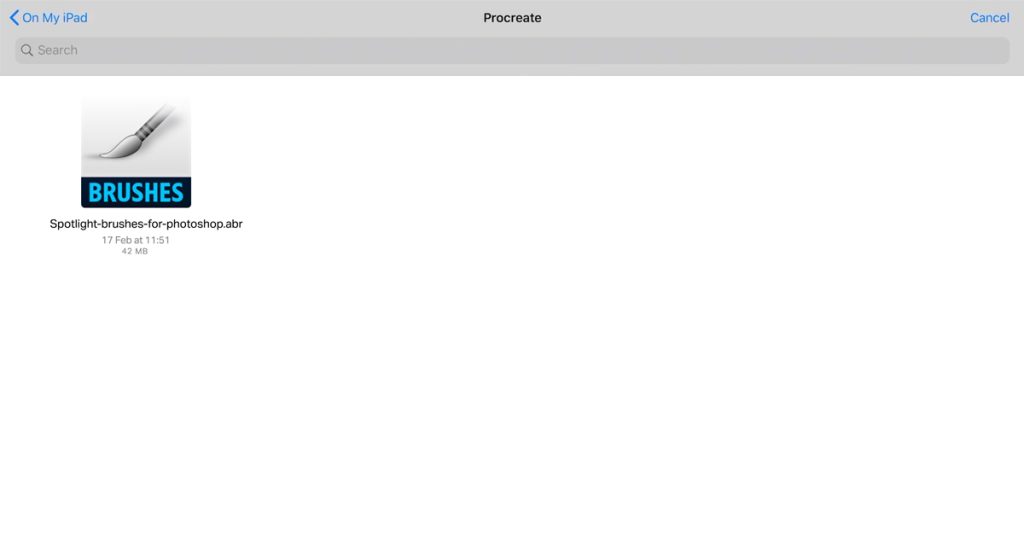
- Navigate to the location where you saved your ABR file (e.g., iCloud Drive, Dropbox, etc.).
- Select the ABR file to import it into Procreate.
Step 5: Organize and Use Your Brushes
After importing, you’ll see your new brushes within the selected brush set in Procreate. You can rename the brush set for better organization. To start using the brushes:
- Select the brush you want to use from the imported set.
- Adjust the brush settings as needed.
- Start creating your artwork with your newly imported brushes!
How to Import ABR Brushes into Procreate on iPad
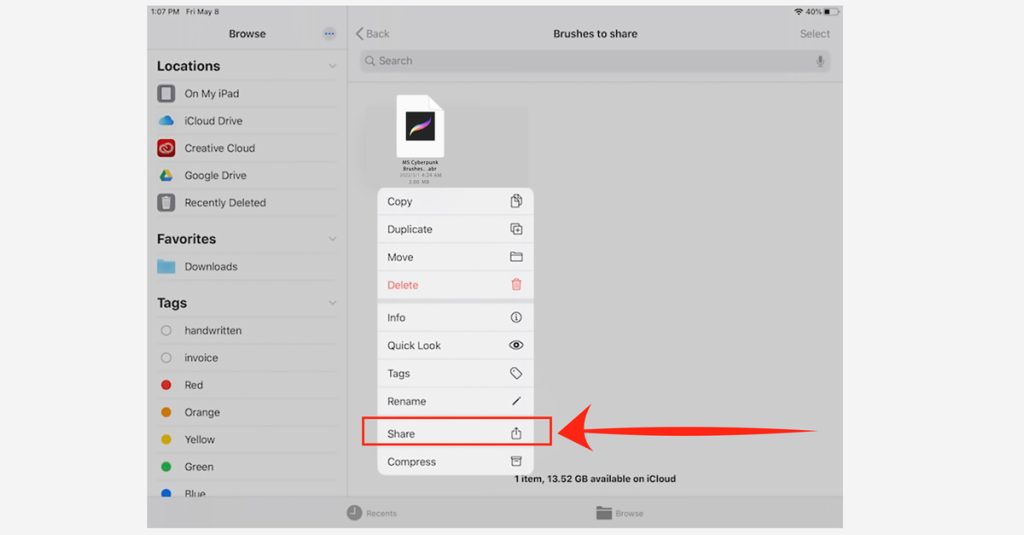
Locate the ABR file on your iPad or cloud storage.
Hold your finger on the brush file and select Share from the options menu
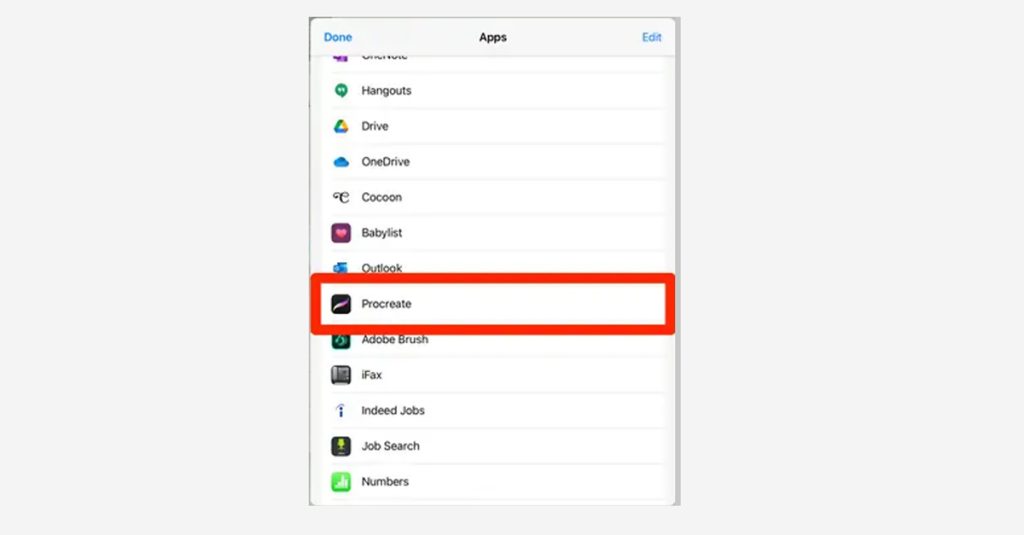
Choose Procreate from the list of apps.
Procreate will automatically import the brushes into your selected brush set.
Congratulations!
You’ve successfully imported ABR brushes into Procreate.
Now you can enjoy a wider variety of tools and enhance your digital art projects.
Happy creating!
“Learn how to import ABR brushes into Photoshop with our easy step-by-step guide.
Master the Waves: Ocean Photoshop Tutorial
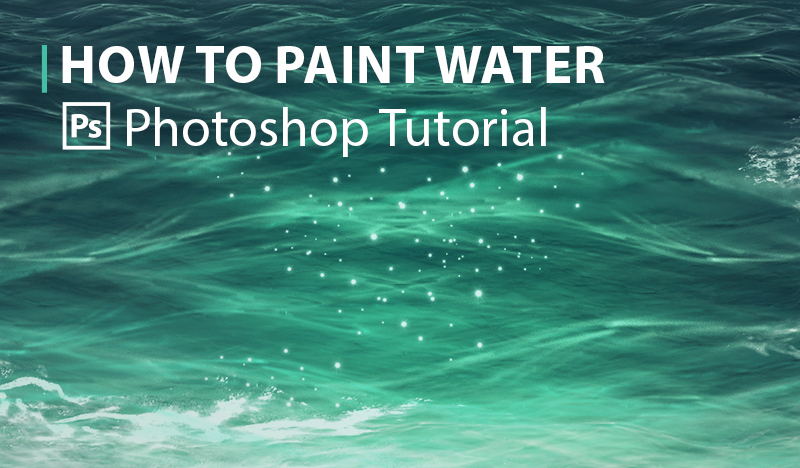
Unleash Your Inner Artist: Ocean Photoshop Tutorial with Premium Brushes
Welcome to our comprehensive ocean Photoshop tutorial! Whether you’re an experienced digital artist or a newcomer eager to dive into the world of seascapes, this guide is designed for you. In this tutorial, we’ll explore the step-by-step process of painting an ocean scene, using our specially designed brushes to bring the waves to life. You’ll learn how to create realistic waves, shimmering reflections, and dynamic light effects that will transform your digital canvas into a breathtaking masterpiece. Ready to embark on this creative journey? Let’s get started!
Tutorial Assets
Step 1
Open a New Document in Photoshop at 5000 x 3000 pixels and 300 dpi.
Step 2: Choosing Your Color Palette
For this tutorial, I used these colors to bring the ocean scene to life. Here are the color codes:
- Base color:
#26424d - Highlight:
#7fb8ab - Highlight 2:
#4bbaa5 - Shadow 1:
#1a333d - Shadow 2:
#0f2025
Step 3: Fill the Background with the Base Color
Use the Paint Bucket tool to fill the background with your base color: #26424D. This deep, oceanic hue will serve as the foundation for your artwork, setting the tone for your sea painting.
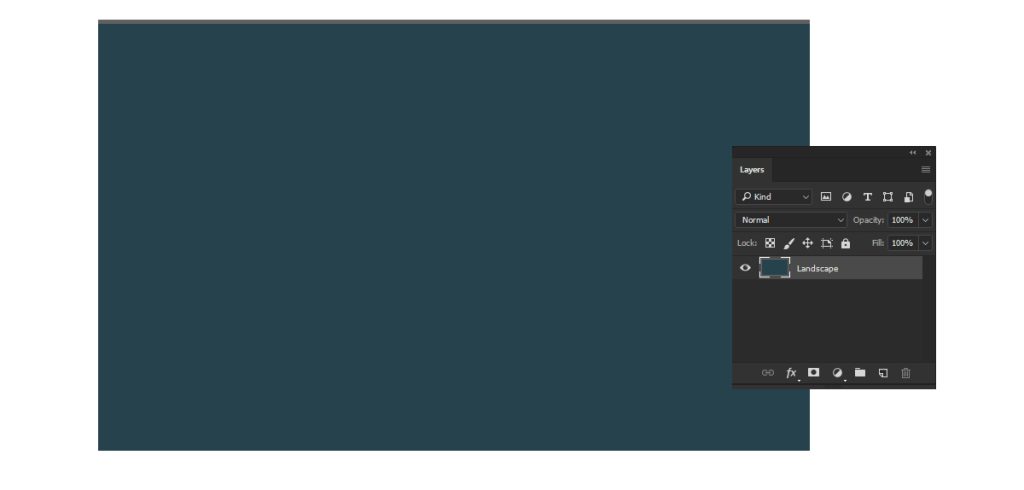
Step 3: Adding Highlights with the Ocean Brush Pack
To use the brushes, you need to load them into Photoshop
First, create a new layer and rename it “Highlight.” Using any brush from the Ocean Brush Pack, set your foreground color to #7FB8AB. Select the Brush Tool (B) and start painting the highlight areas in your ocean scene. This color will add a touch of light and vibrancy, mimicking the way sunlight dances on the waves.
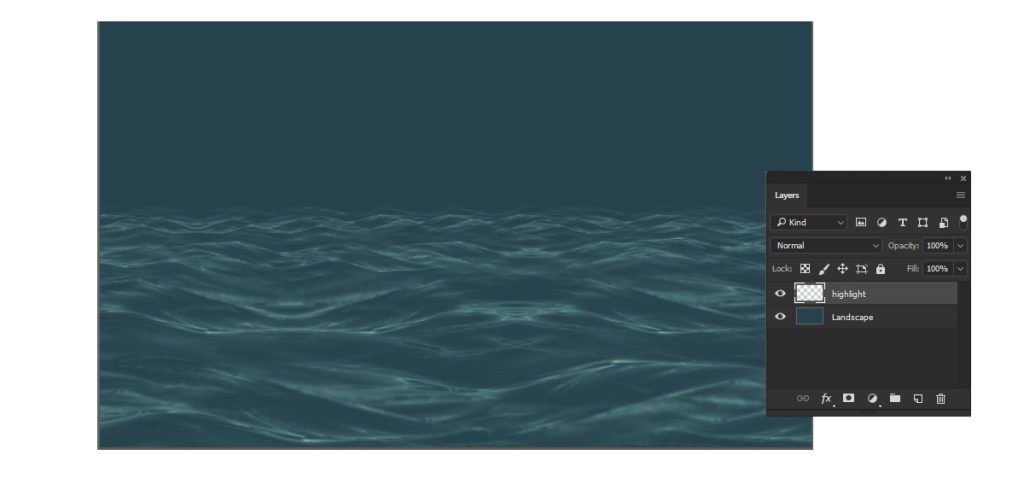
Step 4: Painting the Shadows
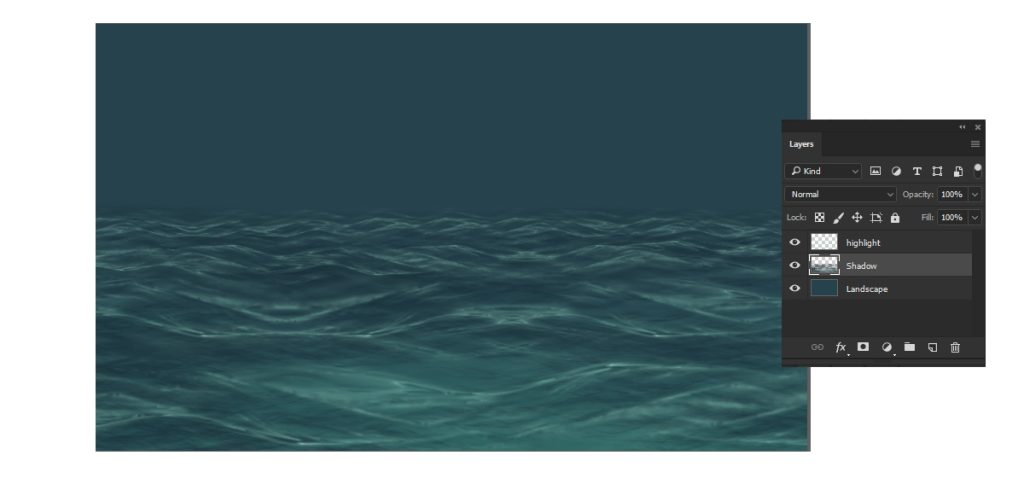
Create a new layer and name it “Shadow.” Place this layer below the “Highlight” layer. Set your shadow color to #1A333D and, using the same brush from the Ocean Brush Pack, paint the shadow areas.
This will add depth and dimension to your ocean scene, enhancing the contrast and making the highlights stand out even more.
Step 5: Adding Secondary Highlights
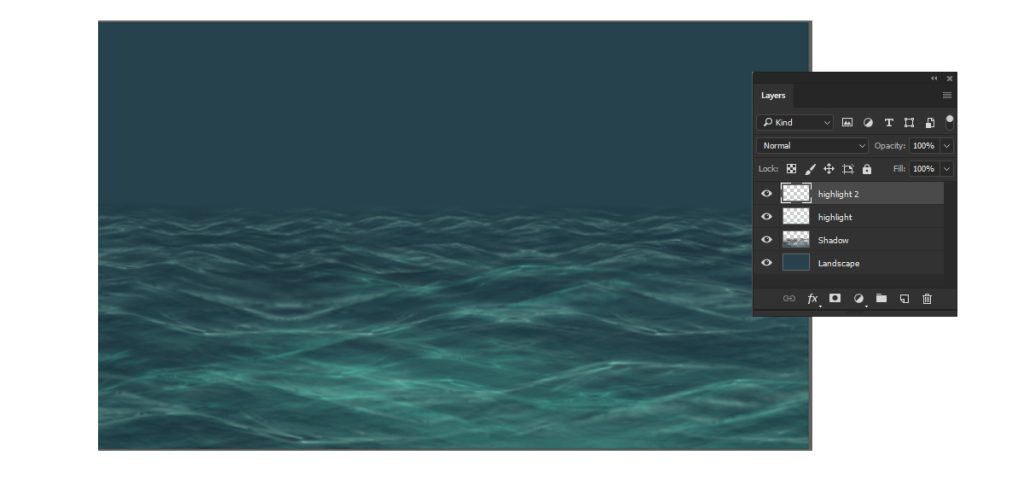
Create a new layer and rename it “Highlight 2.” Position this layer above the “Highlight” layer. Set your shadow color to #4bbaa5, paint your secondary highlights in this layer.
This will enhance the light and detail in your ocean scene, adding an extra dimension to your artwork.
Step 6: Adding Second Layer of Shadows
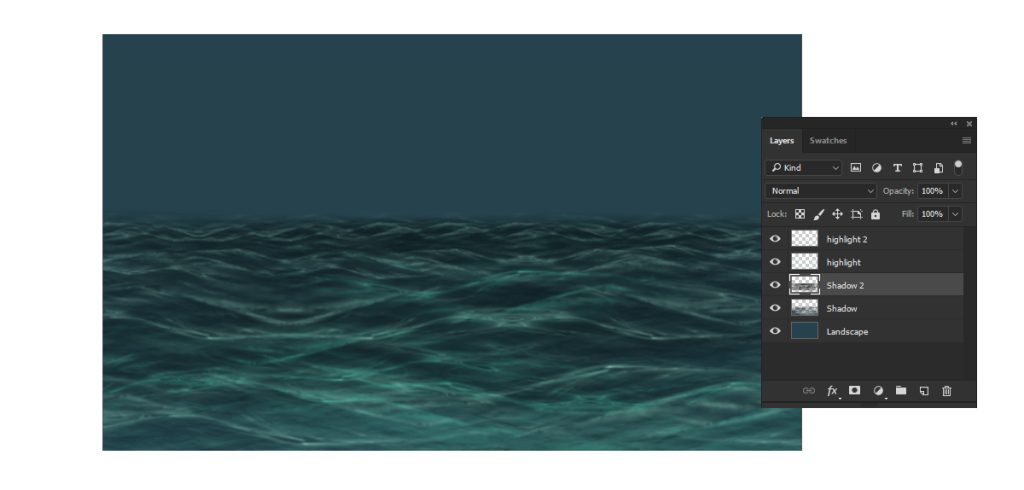
Create a new layer and rename it “Shadow 2.” Place this layer above the “Shadow” layer. Set your shadow color to #0F2025. , paint the shadow areas to add more contrast and depth to your ocean scene.
This additional layer of shadows will enhance the dimensionality of your artwork, making it even more realistic.
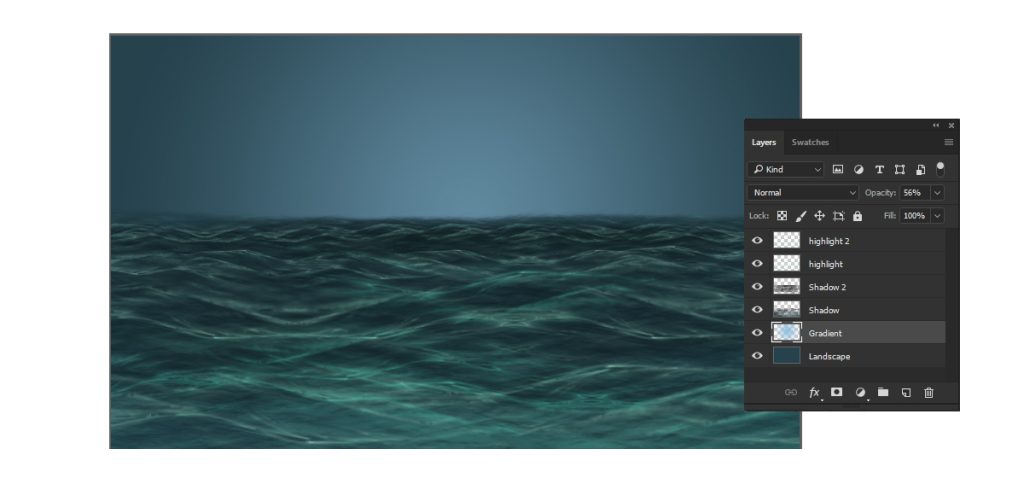
Step 7: Painting the Light
Create a new layer and position it below the “Highlight” layer. Select the Gradient Tool and choose the Radial Gradient option.
Use this color for the light: #5e869b. Paint the direction of the light in the sky, which will give a sense of illumination and add depth to your ocean scene.
Step 8: Painting the Foam
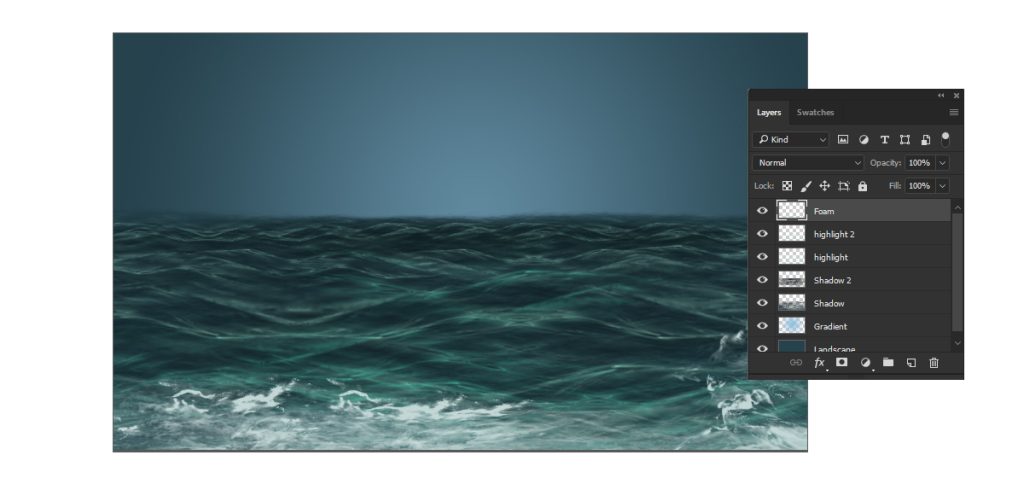
Create a new layer and place it above the “Highlight 2” layer.
Select the Foam Brush from the Ocean Brush Pack, set your foreground color to #FFFFFF (white), and start painting the foam.
This will add the final touch to your ocean waves, creating realistic and dynamic foam patterns that enhance the overall scene.
Step 9: Adding the Glitter
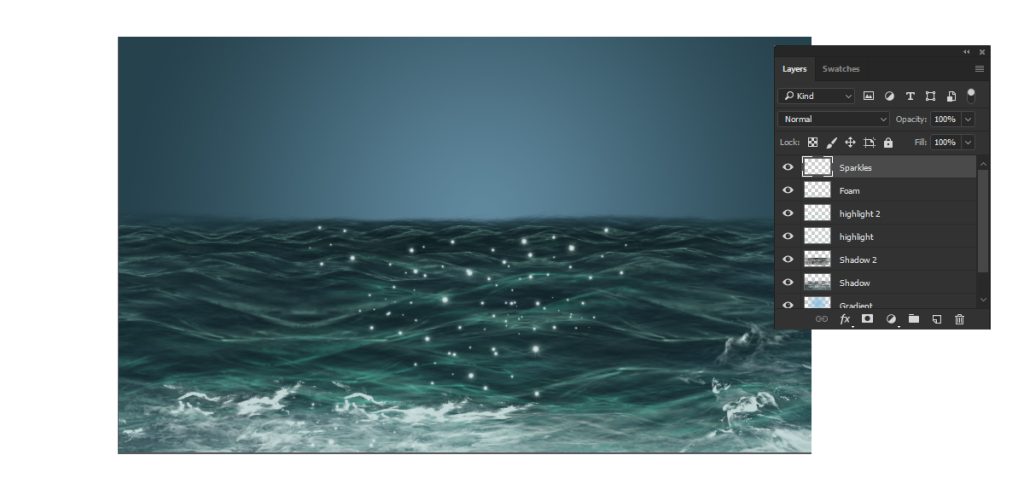
Create a new layer and set it above all the previous layers.
Select a glitter brush from the Ocean Brush Pack and set your foreground color to #FFFFFF (white).
Use the brush to add glittering highlights to the ocean, mimicking the sparkle of sunlight on the water.
This will add a magical and dynamic touch to your artwork, making it truly stand out.
Congratulations! Your Ocean Painting Tutorial is Complete
Great job following along! You’ve successfully created a stunning ocean scene in Photoshop using our premium brushes. If you want to see the entire process in action, you can watch the video tutorial here.
How to Create a Black Hole in Photoshop

How to Create a Black Hole in Photoshop!
This tutorial will also introduce you to a new technique for Photoshop that I have developed to create realistic black hole in photoshop with brushes. This technique is simple and effective, and it can be used to create different types of black holes with different colors and shapes. You will be amazed by the results you can achieve with this technique and the brush set. So, if you are ready to learn something new and exciting, let’s begin this tutorial!
Tutorial Resources

Step 1: Create a new file and a dark background color.
The first step is to create a new file in Photoshop with the dimensions of your choice.
I’m using a 2500 x 1605 PX file with a resolution of 300 dpi. You can use any size you want, but make sure it is large enough to fit your space scene.
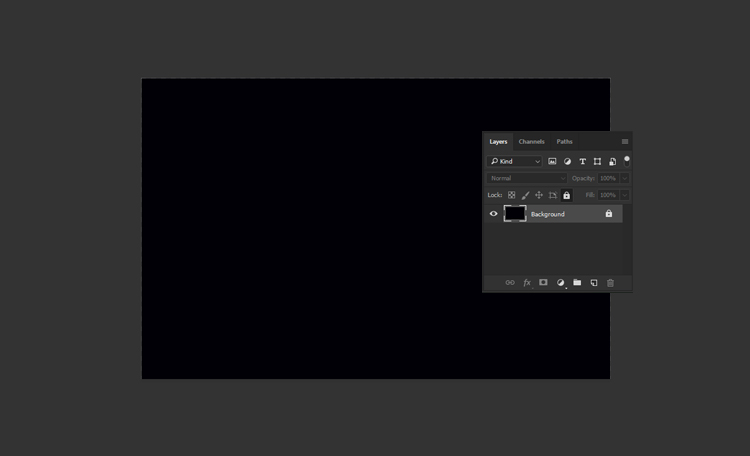
Next, we need to fill the background with a dark color. You can use any dark color you like, but I recommend using a very dark blue or purple to create some contrast with the stars and planets later. To fill the background, select the Paint Bucket Tool (G) and click on the canvas.
You should have something like this:
Step 2: Import our brushes and select the nebula you want.
The next step is import brushes.
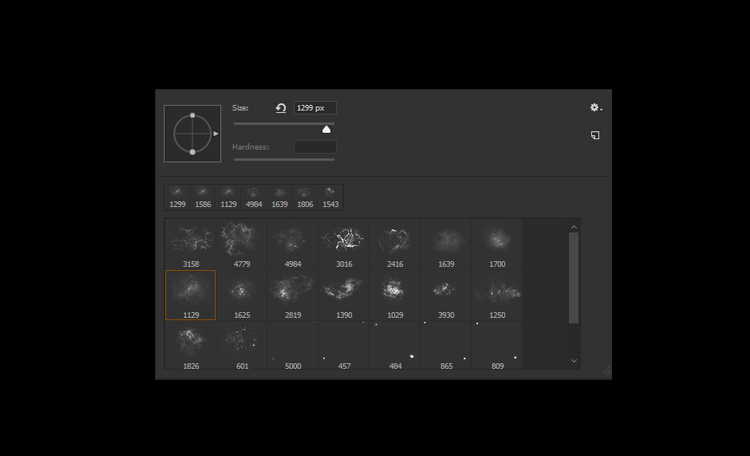
Now, we are going to use one of the brushes to create a nebula. A nebula is a cloud of dust and gas in space.
To create a nebula, select the Brush Tool (B) and choose one of the brushes from the set, which looks like this.
Step 3: Paint with nebula in a circular movement
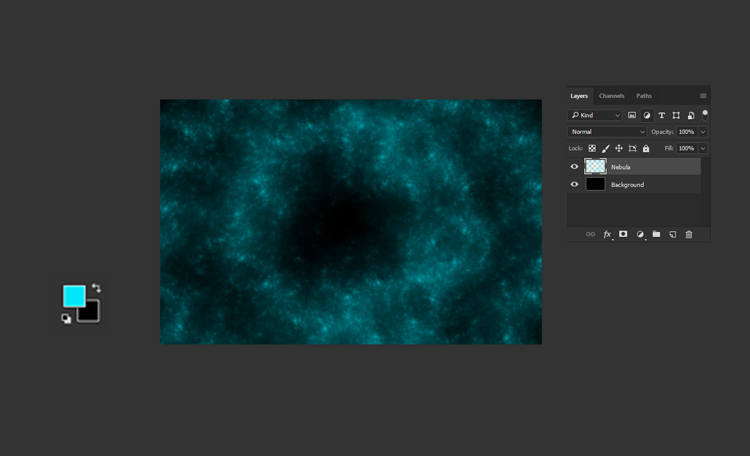
The next step is to change the foreground color to #00e5f8 , which is a bright cyan color. You can use the Color Picker or type the hex code in the box.
Next, create a new layer (Ctrl+Shift+N) and name it Nebula. On this layer,
Paint with the nebula brush in a circular motion around the center of the canvas to create a more dynamic and realistic effect.
Step 4: Merge layers and apply twirl filter.
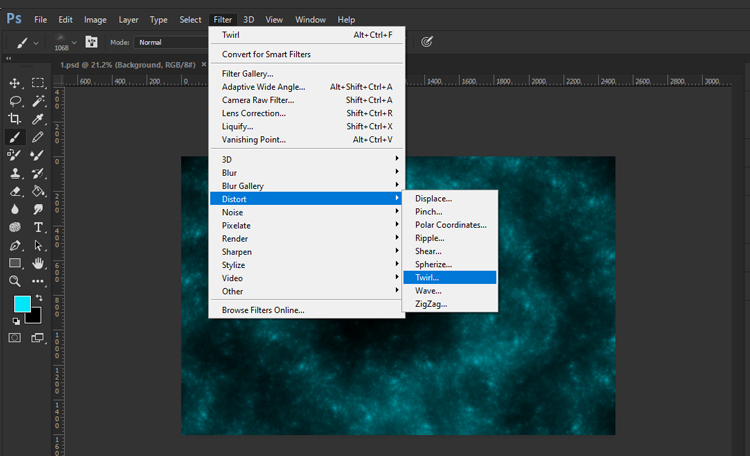
The next step is to merge the nebula layers and apply a twirl filter to create a spiral effect.
To do this, select both nebula layers in the Layers panel and press Ctrl+E to merge them. Then,
go to Filter > Distort > Twirl
and adjust the angle as you like.
Step 5: Use angle to create a black hole.
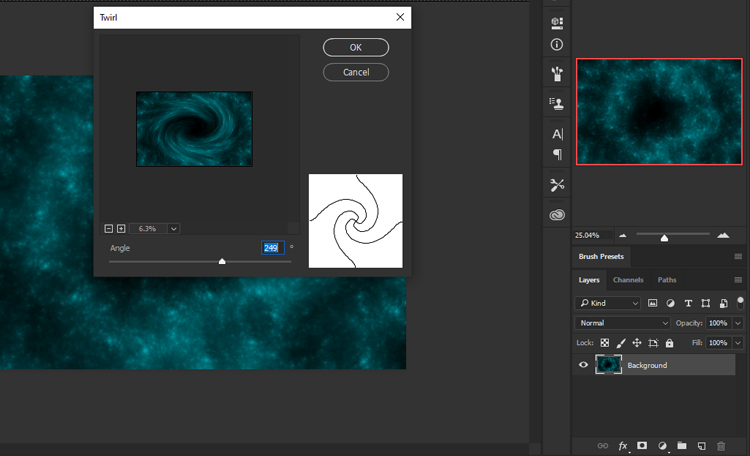
The angle is the amount of rotation that the filter applies to the image. The higher the angle, the more twisted the image becomes. The lower the angle, the less twisted the image becomes. You can use any angle you want, but I recommend using a high angle to create a spiral effect.
I’m using an angle of 249 degrees. You should have something like this.
Step 6: Create a new layer and paint some edges in the corner.
The next step is to create a new layer and use the same nebula brush to paint some edges in the corner of the canvas. This will add some depth and interest to your space scene. To do this, select the Brush Tool (B) and choose the same nebula brush as before.
Then, create a new layer. On this layer, click and drag the brush along the edges of the canvas. You can use any color you like, but I recommend using a lighter color than the background. You should have something like this:
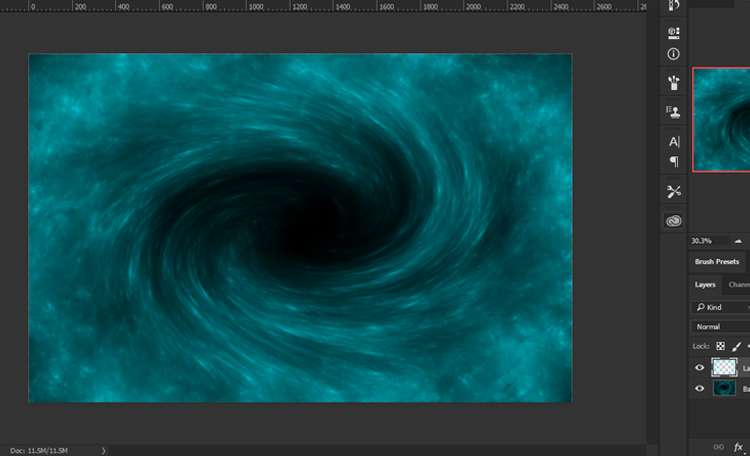
Next, add some stars to your space scene using the dynamic stars brush in this pack. This brush will create different sizes and brightness of stars depending on the pressure and speed of your stroke.
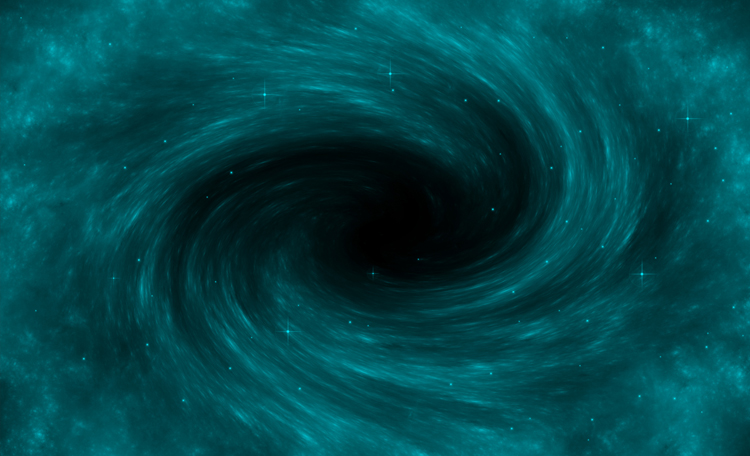
Congratulations!
You have successfully created a stunning black hole scene in Photoshop using a custom brush set for space. I hope you enjoyed this tutorial and learned something new. Thank you for following along!